Classic Chocolate Lava Cake Recipe, Easy French Dessert in 27 Minutes
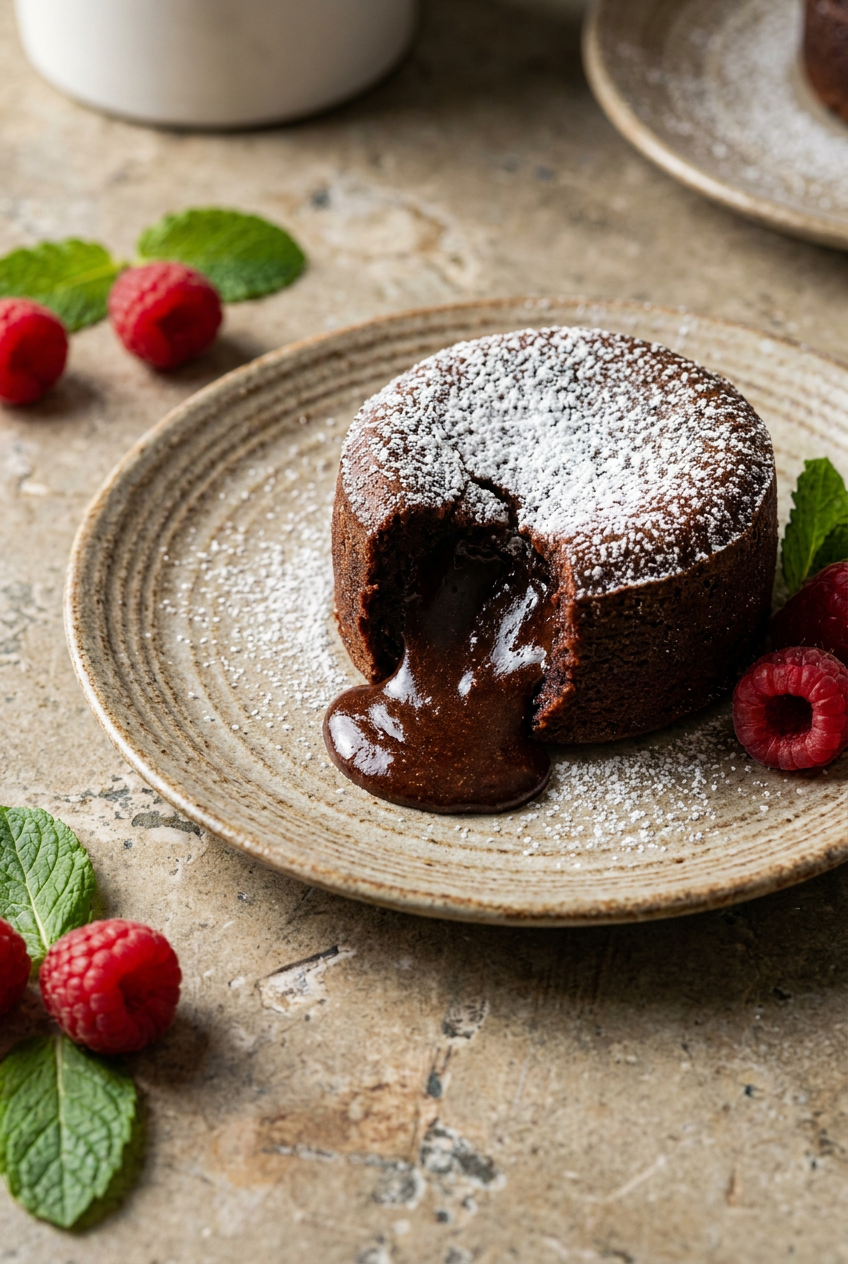
Table of Contents
- Classic Chocolate Lava Cake: A decadently rich, warm chocolate cake with a molten center that flows like lava, yet deceptively simple to prepare.
- Why You Will Love This Classic Chocolate Lava Cake Recipe
- Your Simple Ingredients for the Perfect Classic Chocolate Lava Cake
- How to Make Perfect Classic Chocolate Lava Cake
- Pro Tips and Easy Variations for Your Classic Chocolate Lava Cake
- Serving Suggestions
- Nutrition Information
- Storage and Make-Ahead Instructions
- Your Classic Chocolate Lava Cake Questions Answered
- More Incredible French Recipes to Try
- The Story Behind This Recipe
- Pin This Recipe for Later
Classic Chocolate Lava Cake: A decadently rich, warm chocolate cake with a molten center that flows like lava, yet deceptively simple to prepare.
This classic chocolate lava cake recipe is one of those desserts that feels like pure magic the moment your spoon breaks through the delicate, lightly crackled exterior. I still remember the first time I made it for a quiet date night at home. The kitchen smelled like a Parisian patisserie, the soft glow of the oven light illuminating those little ramekins. I had been nervous, certain I’d overbake them and lose that fabled molten heart. When the center pooled out in a glossy, dark river, my heart did a little flip. We stood at the counter, forks in hand, barely able to wait the thirty seconds before diving in. That moment of shared delight, the interplay of warm, bittersweet chocolate and cool vanilla ice cream, is something I hope you get to experience too. It is a dessert made for quiet celebrations, for “just because” evenings, and for impressing the people you love without spending hours in the kitchen.
What sets this particular lava cake apart is how intensely chocolate-forward it is while remaining beautifully balanced. Many recipes lean on large amounts of sugar or rely on flour for structure, dulling the chocolate’s complexity. Here, the ratio of high-cocoa dark chocolate to butter, egg, and just a whisper of flour creates a texture that is part soufflé, part fudgy truffle. The gentle folding technique, the careful ribbon stage of the eggs, the dusting of cocoa instead of flour in the ramekins—all these small steps work together to produce a cake that rises proudly yet collapses into that signature liquid core. If you have ever tried my fluffy Japanese souffle pancakes, you will recognize a similar principle: the magic hinges on whipping eggs to the perfect volume and handling the batter with a tender touch. Here, though, the result is all about deep, dark chocolate luxury rather than airy lightness.
This recipe is for anyone who has ever believed that restaurant-quality desserts require professional skills. It is for the home cook who wants to serve something dramatic at a dinner party, for the parent who wants to make a birthday feel extraordinary, for the chocolate lover who needs a truly soul-satisfying fix. The batter comes together in about fifteen minutes, and the baking time is shockingly short. I have broken down every step so you can feel confident, even if you have never made a molten cake before. All you need are four little ramekins, a few simple ingredients, and a sense of anticipation. Once you pull those puffed little marvels from the oven, and watch the powdered sugar drift onto their dark domes, you will understand why this dessert has become a timeless classic.
Why You Will Love This Classic Chocolate Lava Cake Recipe
- Intensely chocolate flavor without excess sweetness. Using dark chocolate with at least 70% cocoa means the cake tastes deeply of real chocolate rather than just sugar. A hint of salt sharpens the chocolate notes perfectly, making every bite complex and satisfying.
- That magnificent molten center never fails to impress. The contrast between the tender, cake-like shell and the warm liquid core is pure drama. It transforms a simple dessert into a showstopper, and it takes only twelve minutes in the oven.
- Surprisingly forgiving for a seemingly tricky dessert. While the timing is important, the batter itself is straightforward and the visual cues are easy to read. Edges set, center jiggly—that’s your signal. My pro tips will help you nail it on the very first try.
- Make-ahead magic for stress-free entertaining. You can prepare the ramekins and fill them with batter up to a full day in advance and stash them in the fridge. When guests arrive, simply pop them in the oven and serve warm, freshly baked cakes minutes later.
- Adaptable to your own flavor whims. The base recipe is a canvas. Stir in espresso powder, orange zest, or even a tiny pinch of chili. You can create signature versions without changing the method, making it a wonderful go-to recipe you will return to again and again.
- Uses ingredients you likely already have on hand. Aside from the dark chocolate, the list is built from pantry and fridge staples: butter, eggs, sugar, flour, cocoa powder. That means a sudden chocolate craving can be answered without a special trip to the store.
Your Simple Ingredients for the Perfect Classic Chocolate Lava Cake
- Main
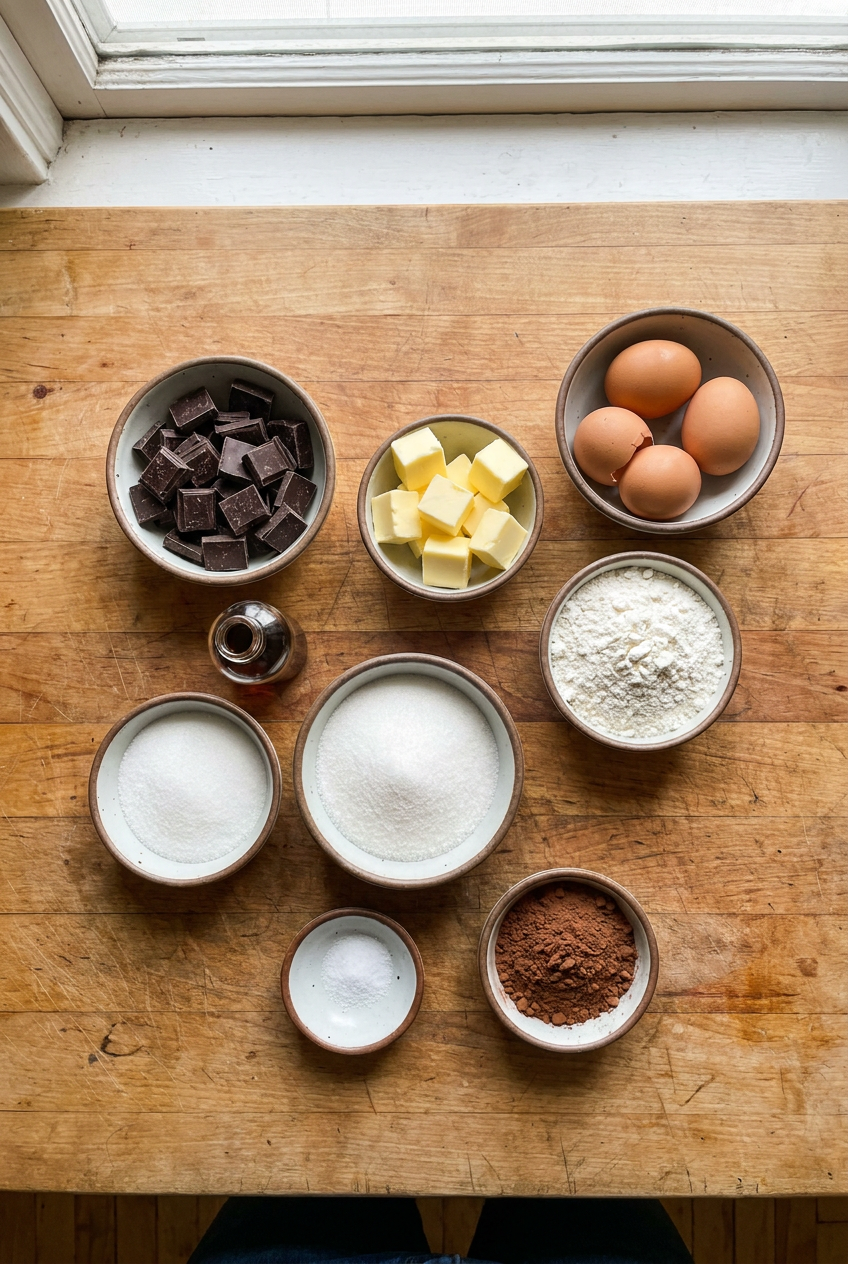
- 4 oz dark chocolate (70% cocoa), finely chopped
- 1/2 cup unsalted butter, cut into pieces
- 2 large eggs, at room temperature
- 2 large egg yolks, at room temperature
- 1/4 cup granulated sugar
- 2 tbsp all-purpose flour, sifted
- pinch salt
- For Ramekins
- 1 tbsp unsalted butter, melted, for greasing
- 1 tbsp cocoa powder, for dusting
- Garnish
- 1 tbsp powdered sugar, for dusting
- 1/2 cup fresh raspberries, optional
Ingredient Notes
Dark chocolate (70% cocoa): This is the soul of the lava cake. A bar with at least 60%, ideally 70%, cocoa solids delivers the deep, almost smoky character that keeps the dessert from becoming cloying. Look for couverture or a brand you enjoy eating on its own. Do not use chocolate chips, which contain stabilizers that inhibit smooth melting. If 70% is too intense for your palate, you can use a 60% chocolate, but avoid milk chocolate entirely because its higher sugar and milk solids alter the texture and prevent the molten core from setting up properly.
Unsalted butter: Butter adds richness and helps create the soft, almost silky crumb. Unsalted butter gives you control over the salt level, and since chocolate already contains a trace of bitterness, salt balance matters. European-style butter with a higher fat content will yield an even more luxurious result, but any good-quality unsalted butter works. Make sure it is at room temperature for easier melting with the chocolate.
Eggs and egg yolks: The combination of whole eggs and extra yolks is what builds the tender structure while keeping the cake moist enough to hold that liquid center. The eggs must be at room temperature so they whip up to the greatest possible volume and stabilize the batter. If you forget to take them out of the fridge early, place them in a bowl of warm water for ten minutes. Using fresh, high-quality eggs makes the whisking process faster and gives a better rise.
Granulated sugar: A modest quarter cup sweetens the batter just enough to counter the bitterness of the dark chocolate without masking its complexity. It also helps the egg mixture reach that glossy, ribbony stage. Do not substitute with liquid sweeteners here; the granular structure is part of what traps air during whisking.
All-purpose flour: Just two tablespoons lend enough gluten to give the edges a delicate cake-like texture while keeping the center fluid. Sifting prevents clumps that could weigh down the batter. If you need a gluten-free option, a measure-for-measure gluten-free flour blend works well, though the texture may be slightly more fragile.
Cocoa powder for dusting: Dusting the buttered ramekins with cocoa instead of flour deepens the color of the crust and adds a subtle chocolate flavor right where the cake meets the dish. Use unsweetened natural or Dutch-process cocoa, whichever you have. It also helps the cakes release cleanly without any pale, floury patches.
How to Make Perfect Classic Chocolate Lava Cake
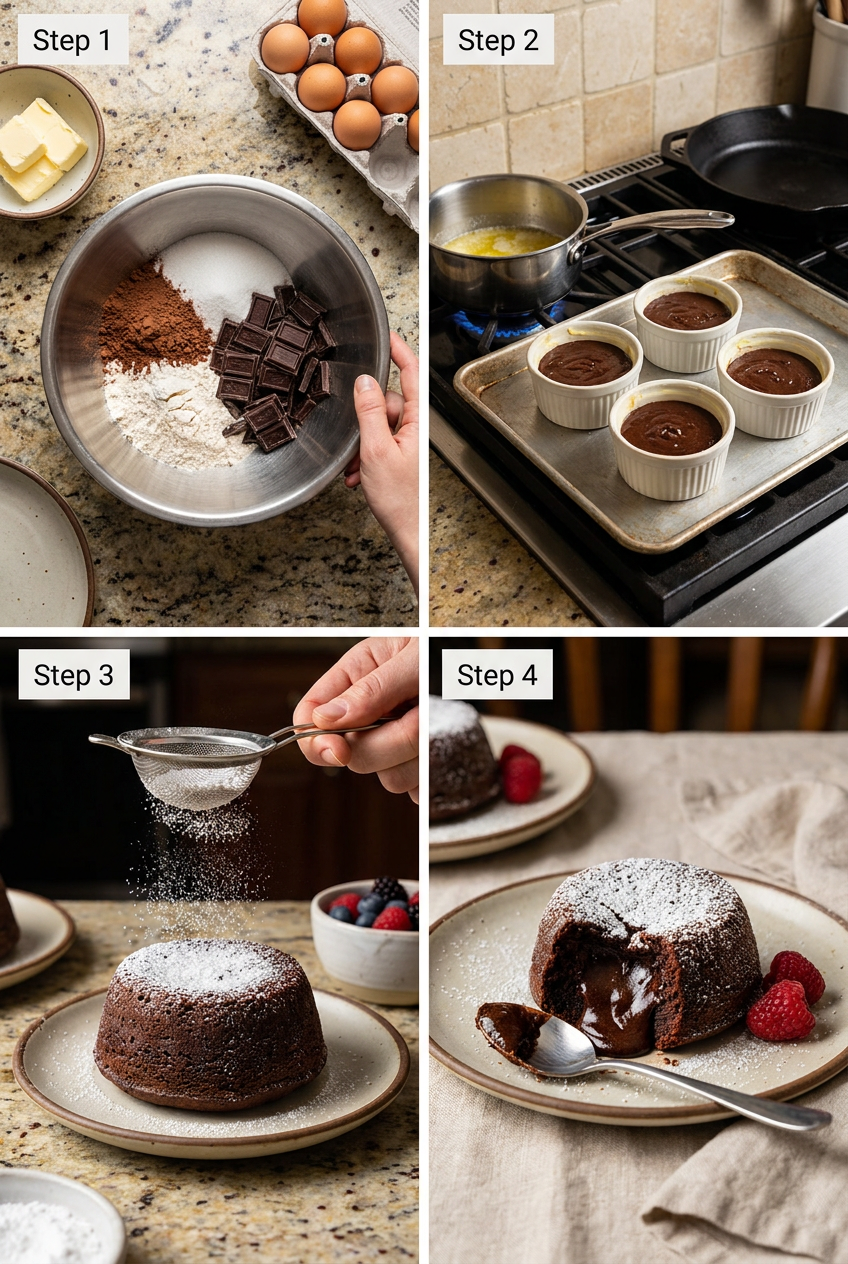
Phase 1: Preheat and Prepare Ramekins
Preheat your oven to 425°F (220°C) with a rack placed in the middle position. The intense heat is essential for quickly setting the outside while leaving the middle liquid. While the oven warms, take four 4-ounce ramekins and brush the insides generously with melted butter, using upward strokes to coat every corner. Sprinkle a spoonful of cocoa powder into one ramekin, then rotate and tap it so the cocoa sticks to the butter and covers all surfaces evenly. Tip the excess cocoa into the next ramekin and repeat until all four are coated. Discard any remaining cocoa. Place the ramekins on a small baking sheet so they are easy to move in and out of the oven. The cocoa dusting not only adds flavor but also ensures you see a beautifully dark, flawless crust when the cake is unmolded.
Phase 2: Melt the Chocolate and Butter
Fill a small saucepan with about an inch of water and bring it to a very gentle simmer over low heat. Place a heatproof bowl on top, making sure the bottom of the bowl does not touch the water. Add the finely chopped dark chocolate and the butter pieces to the bowl. Stir slowly and constantly with a silicone spatula or wooden spoon as they soften together into a glossy, dark pool. The key is low, indirect heat; any steam that sneaks into the chocolate could cause it to seize and turn grainy. Once the mixture is completely smooth and you see no flecks of unmelted chocolate, remove the bowl from the heat and set it aside to cool slightly for about three to four minutes. You want it warm enough to remain fluid but not so hot that it will cook the eggs in the next step.
Phase 3: Whip the Eggs and Sugar
In a separate, clean mixing bowl, crack the two whole eggs and add the two additional egg yolks, the quarter cup of granulated sugar, and the pinch of salt. Using a hand whisk and a bit of elbow grease, whip the mixture vigorously for about two to three minutes, or use an electric mixer on medium-high speed for about one minute. You are looking for the ribbon stage: when you lift the whisk, the mixture should fall back in a thick, pale ribbon that sits on the surface for a few seconds before slowly melting back in. This step aerates the batter and gives the cake a wonderful lift. Much like the careful spicing in my Moroccan chicken tagine, precision here is everything; the visual cue of the ribbon tells you the eggs are ready.
Phase 4: Combine and Fill
Pour the cooled but still fluid chocolate mixture over the whipped eggs. Using a rubber spatula, fold the two together with a gentle, sweeping motion, scraping around the bowl and turning it over until the marbled streaks just begin to disappear. Sift the two tablespoons of flour over the top and continue folding only until no white specks remain. Overmixing at this stage will deflate those precious air bubbles and lead to a denser cake, so stop the moment the flour fully incorporates. Divide the batter equally among the four prepared ramekins. Each should hold roughly half a cup of batter. The unbaked cakes will look quite liquid, but they will rise beautifully in the oven.
Phase 5: Bake to Molten Perfection
Carefully transfer the baking sheet with the filled ramekins to the hot oven and bake for 12 to 14 minutes. Begin checking at the 11-minute mark because every oven behaves a little differently. You will know the cakes are ready when the edges have puffed and appear set, while the very center still shimmies and wobbles if you give the ramekin a gentle nudge. The top surface will look dry and lightly cracked, like a tiny soufflé. A toothpick inserted near the edge should come out almost clean, while one poked into the middle will have moist, shiny crumbs clinging to it. Remember that the center is molten and undercooked; for food safety, consider using pasteurized eggs to minimize risk. Once baked, move immediately to the unmolding step without letting them sit.
Phase 6: Rest, Unmold, and Serve
Let the cakes rest in the ramekins for exactly 30 seconds once out of the oven. This brief pause allows the structure to stabilize just enough for a clean release. Run a thin, flexible knife around the inside edge of each ramekin to loosen the cake. Place a small dessert plate upside down over the top of the ramekin, hold them together firmly, and quickly invert. Gently lift the ramekin straight up to reveal the cake standing proud, its dark sides dusted with cocoa. If a cake feels stuck, give the bottom of the ramekin a light tap with the back of a spoon. Work swiftly so the residual heat does not continue to cook the center. Immediately dust the tops with powdered sugar, scatter a few fresh raspberries around if desired, and serve while that glorious lava is still flowing.
Pro Tips and Easy Variations for Your Classic Chocolate Lava Cake
Pro Tips
- Invest in a kitchen scale if you can. Measuring chocolate and flour by weight rather than volume eliminates guesswork. Even slight variations in flour can alter the delicate balance between molten center and set edges.
- Practice with a single ramekin first. If you are nervous about timing, bake just one cake as a test run before committing all four. Note the exact minutes your oven requires, then replicate that for the remaining batch.
- Use the best dark chocolate you can find. Since chocolate is the star, its quality directly determines the final flavor. A bar with fruity or nutty tasting notes from a single-origin source can add wonderful complexity.
- Do not overmix after adding flour. Fold only until the flour disappears. Overworking the batter will make the cake tough and can collapse the air you carefully whipped into the eggs.
- Prepare your ramekins meticulously. Every inch must be coated with butter and cocoa, especially the bottom edges. Missing a spot can cause the cake to stick and ruin the dramatic unmolding reveal.
- Let the batter rest if it feels too thin. After filling the ramekins, you can pop them in the fridge for five minutes to firm up slightly before baking. This can help achieve an even taller rise.
Delicious Variations
- Mocha Lava Cake. Add one teaspoon of instant espresso powder to the melted chocolate and butter mixture. The coffee deepens the chocolate flavor without making the cake taste like coffee, lending a subtle, sophisticated edge that adult palates adore.
- Orange-Chocolate Lava Cake. Finely grate the zest of one medium orange and gently fold it into the batter just before dividing among the ramekins. The bright citrus oils lift the richness and create a classic flavor pairing reminiscent of elegant chocolate orange confections.
- Salted Caramel Surprise. Push a frozen cube of soft caramel or dulce de leche into the center of the batter in each ramekin before baking. As the cake bakes, the caramel melts into a gooey, salty-sweet core that mingles with the chocolate.
- Spiced Mayan Lava Cake. Add a quarter teaspoon of ground cinnamon and a tiny pinch of cayenne pepper to the flour before sifting. The gentle warmth plays beautifully against the cool powdered sugar and a scoop of vanilla ice cream.
- Mint Chocolate Dream. Replace two tablespoons of the dark chocolate with finely chopped dark mint chocolate or add a quarter teaspoon of pure peppermint extract to the egg mixture. Serve with a dollop of whipped cream and a sprig of fresh mint for a refreshing finish.
For a completely different yet equally comforting treat, you might enjoy my blueberry lemon ricotta pancakes when you are craving something bright and cheerful in the morning.
Serving Suggestions for a Perfect Dessert
A classic chocolate lava cake shines brightest with a small scoop of vanilla bean ice cream melting slowly into its warm, oozing center. The hot and cold contrast is absolute heaven. If you prefer something tangier, a quenelle of crème fraîche or a drizzle of raspberry coulis cuts through the richness beautifully. A few fresh raspberries, strawberries, or even some orange segments add a fruity pop of color and acidity. For beverages, serve with a strong espresso, a tiny glass of ruby port, or a late-harvest Riesling to echo the chocolate notes. Dusting the plate with a little extra powdered sugar and tucking a sprig of mint alongside the cake makes the presentation feel effortlessly elegant.
This dessert fits wonderfully into so many moments. It is intimate enough for a special anniversary dinner at home, yet simple enough to end a casual Sunday supper with family. When hosting a dinner party, you can prepare the ramekins in advance and have them ready to slide into the oven while you clear the main course. To serve a crowd, the recipe doubles or triples easily; just make sure you have enough ramekins and a large enough baking sheet. If you have guests with a lighter appetite, one cake shared between two people with a generous scoop of ice cream can be wonderfully decadent without feeling too heavy.
Nutrition Information
(Approximate per serving, 4 servings total) Calories: 450, Fat: 30g, Carbohydrates: 45g, Protein: 8g, Fiber: 3g, Sodium: 100mg. Nutritional values are estimates only.
Storage and Make-Ahead Instructions
- Refrigerator: Unbaked batter in prepared ramekins can be covered tightly with plastic wrap and refrigerated for up to 24 hours. Baked lava cakes are best enjoyed immediately, but if you have leftovers, cover them and store in the refrigerator for up to 2 days. The center will firm up when cold.
- Freezer: Freezing is not recommended for this recipe. The delicate texture of the molten center does not survive freezing and thawing well, becoming grainy and dry.
- Reheating: To revive a refrigerated, fully baked cake, place it on a microwave-safe plate and heat in the microwave for 15 to 20 seconds. This will remelt the center slightly, restoring some of the original lava magic. Avoid overheating, or the whole cake will become rubbery.
- Make-Ahead: The most reliable make-ahead method is to fill the buttered and cocoa-dusted ramekins with batter, cover, and refrigerate for up to 24 hours. When ready to bake, place the cold ramekins directly into the preheated oven and add 1 to 2 extra minutes to the baking time. Check for the wobble as usual.
Your Classic Chocolate Lava Cake Questions Answered
Why didn’t my lava cake have a molten center?
It likely overbaked. The cake should be removed when the edges are firm but the center jiggles noticeably, usually at 12 to 14 minutes in a 425°F oven. A toothpick inserted near the edge should come out clean, while one in the middle should have moist crumbs. If you wait until the center is fully set, the lava core will be gone.
Can I use milk chocolate instead of dark?
Dark chocolate is essential for the right texture and intensity. Milk chocolate has more sugar and milk solids, making it sweeter and less stable when melted. It may result in a greasy, over-sweet cake without a true lava core. Stick to 60 to 70% cocoa.
How far in advance can I make the batter?
You can prepare the batter, fill the greased ramekins, cover them, and refrigerate for up to 24 hours. When ready, bake straight from the fridge, adding 1 to 2 extra minutes. The batter can also be made, cooled, and refrigerated in a bowl, but you will need to let it soften at room temperature before piping or spooning into ramekins.
What if I do not have ramekins?
You can use a standard muffin tin with 4-ounce capacity cups. Butter and cocoa dust each cup thoroughly. The baking time might be slightly shorter, so start checking at 10 minutes. Mini soufflé dishes or oven-safe ceramic cups also work well.
Can I make these gluten free?
Yes, substitute the all-purpose flour with a good quality measure-for-measure gluten-free flour blend. The texture will be a tiny bit more delicate but still wonderfully molten. Avoid single-ingredient flours like almond or coconut flour, as they behave differently.
Why did my cakes sink immediately after baking?
Some sinking is normal because the center is liquid. However, if they collapse completely and seem heavy, the eggs may have been overwhipped or the batter overmixed. Also, the oven temperature might have been too low, failing to set the structure quickly enough.
Can I add a splash of liqueur to the batter?
Absolutely. A tablespoon of dark rum, Grand Marnier, or amaretto adds a lovely depth. Stir it into the melted chocolate mixture before combining with the eggs. Avoid adding more than a tablespoon, as too much liquid can throw off the balance.
How do I know when the eggs are at ribbon stage?
Lift your whisk and let the mixture fall back into the bowl. It should form a thick ribbon that settles on the surface and holds its shape for a good three to five seconds before slowly dissolving. The color will be pale, almost butter-yellow, and the texture will look aerated.
Is it safe to eat the molten center?
The center is undercooked egg and chocolate, which carries a small risk of foodborne illness. To minimize risk, use pasteurized eggs, which are widely available in supermarkets. You can also check that the entire cake reaches 160°F (71°C) with an instant-read thermometer, though this may slightly set the center.
More Incredible French Recipes to Try
If the elegant simplicity of this lava cake captured your heart, you will adore exploring other French desserts that feel luxurious but are wonderfully achievable at home. A silky pot de crème, for example, offers the same deep chocolate satisfaction with an almost effortless stovetop method. A classic crème brûlée delivers that beloved contrast between a burnished sugar crust and a creamy, vanilla-flecked custard underneath. For a lighter finish, a lemon soufflé whipped up with fresh citrus and a cloud-like texture can be a showstopping conclusion to a meal.
On the savory side, French cuisine has so many comforting, slow-cooked dishes that complement a rich dessert like this. My Moroccan
Classic Chocolate Lava Cake
Ingredients
Method
- Preheat your oven to 425°F (220°C). Brush the insides of four 4-ounce ramekins generously with melted butter, then dust with cocoa powder, tapping out the excess. Place them on a baking sheet.
- In a heatproof bowl set over a saucepan of simmering water (double boiler), combine the chopped chocolate and butter. Stir gently until completely melted and smooth. Remove from heat and let cool slightly for 3–4 minutes.
- In a separate mixing bowl, whisk together the eggs, egg yolks, sugar, and salt until the mixture is pale, thick, and ribbony—about 2–3 minutes by hand or 1 minute with an electric mixer.
- Pour the slightly cooled chocolate mixture into the egg mixture and fold gently with a rubber spatula until just combined. Sift the flour over the top and fold again until no streaks remain. Do not overmix.
- Divide the batter evenly among the prepared ramekins (about 1/2 cup each). Bake for 12–14 minutes, until the edges are set and the center jiggles slightly when shaken. The top should look dry and cracked. For food safety, note that the center will be molten and undercooked; to reduce risk, use pasteurized eggs or ensure the entire cake reaches 160°F (71°C).
- Remove from the oven and let the cakes rest in the ramekins for exactly 30 seconds. Run a thin knife around the edges, place a serving plate upside down on top, and carefully invert. Gently lift off the ramekin.
- Dust with powdered sugar, add a few raspberries on the side, and serve immediately while the center is still molten.
Disclosure: This post may contain affiliate links. If you purchase through our links we may earn a small commission at no extra cost to you.
If you made this Classic Chocolate Lava Cake, please leave a comment below and let me know how it turned out.