Strawberry Danish Recipe, Easy European Dessert in 45 Minutes
Strawberry Danish: Flaky, Buttery Pastry with Sweet Strawberries and Creamy Icing
Table of Contents
- Strawberry Danish: Flaky, Buttery Pastry with Sweet Strawberries and Creamy Icing
- Why You Will Love This Strawberry Danish Recipe
- Your Simple Ingredients for the Perfect Strawberry Danish
- How to Make Perfect Strawberry Danish
- Pro Tips and Easy Variations for Your Strawberry Danish
- Serving Suggestions
- Nutrition Information
- Storage and Make-Ahead Instructions
- Your Strawberry Danish Questions Answered
- More Incredible European Recipes to Try
- The Story Behind This Strawberry Danish
- Pin This Recipe for Later
Strawberry Danish: Flaky, Buttery Pastry with Sweet Strawberries and Creamy Icing
I still remember the first time I bit into a warm, homemade strawberry danish on a lazy Sunday morning. The pastry was impossibly flaky, shattering into delicate layers with each bite, and the center was filled with a sweet, jammy strawberry filling that tasted like summer itself. A thin drizzle of vanilla icing pooled over the top, catching the morning light. It was one of those perfect simple pleasures that made me realize you do not need a bakery within walking distance to enjoy world class pastries. You just need a good recipe and a little bit of patience, and I am sharing that exact recipe with you today.
This strawberry danish recipe is designed to be as easy and reliable as possible while still delivering that classic European bakery experience. The secret lies in three key elements: using store bought puff pastry for convenience, cooking the strawberry filling until it is thick and glossy so it does not make the pastry soggy, and brushing the pastry with egg wash for a beautiful golden brown finish. Many recipes skip the step of cooking the filling first, but that is a mistake you will not make after reading this. A quick stovetop simmer transforms fresh strawberries into a concentrated, flavorful filling that holds its shape perfectly inside the pastry. When you take that first bite and see the steam rise, you will know exactly why this matters.
This recipe is for anyone who loves the idea of homemade pastries but does not have hours to spend laminating dough from scratch. It works beautifully for a special weekend breakfast, a Mother’s Day brunch, or an afternoon tea with friends. You can make it with fresh or frozen strawberries, so it works year round. The process is straightforward enough for a confident beginner but the results are impressive enough to serve to guests. I have tested this recipe more times than I can count, and I promise you it delivers the perfect balance of flaky, buttery, sweet, and tangy every single time. For another simple yet impressive pastry, you might also enjoy these fluffy Japanese souffle pancakes which have a similar airy, delicate texture.
Why You Will Love This Strawberry Danish Recipe
- Unbelievably easy to make from scratch. You only need 15 minutes of active prep time and a handful of simple ingredients. The puff pastry does all the hard work for you, creating those beautiful flaky layers without any complicated folding or chilling steps.
- Perfectly balanced sweet and tangy flavor. The strawberry filling is sweetened just enough to complement the tartness of fresh berries. A squeeze of lemon juice brightens the whole filling and prevents it from tasting overly sugary or cloying.
- No soggy pastry ever. The secret is cooking the strawberry filling on the stovetop until it thickens. This removes excess moisture and concentrates the flavor, so your danish stays crisp and flaky for hours after baking, not just for the first few minutes.
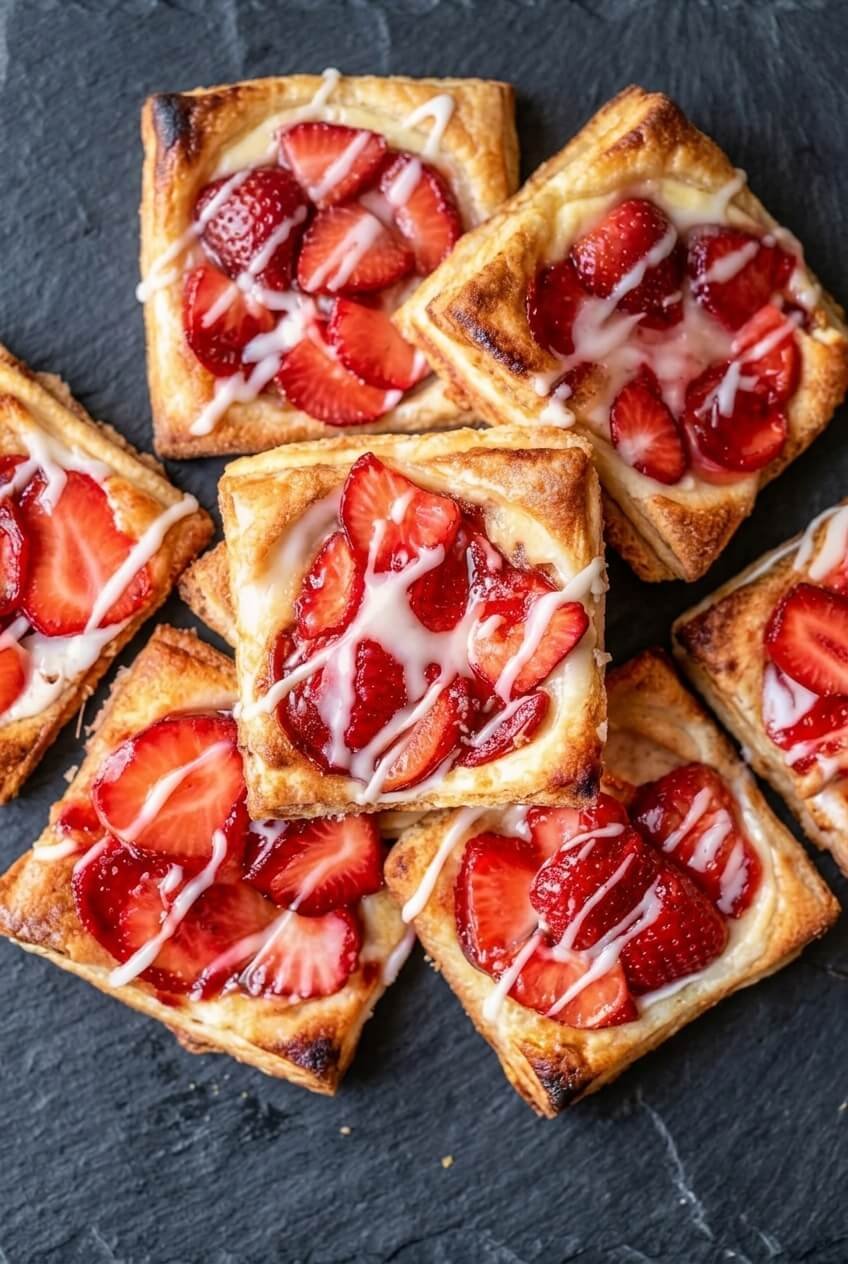
- Beautiful bakery presentation at home. These danishes look stunning with minimal effort. The simple fold over technique creates a classic open faced look, and the vanilla icing drizzle adds that professional finishing touch that makes people think you spent hours in the kitchen.
- Easy to customize with different fruits or add-ins. Once you master this base strawberry danish recipe, you can swap in raspberries, blueberries, or even peaches. A thin layer of cream cheese under the fruit takes these danishes to an entirely new level of indulgence.
Your Simple Ingredients for the Perfect Strawberry Danish
Pastry
- 1 sheet puff pastry (thawed), store-bought or homemade
- 1 tbsp all-purpose flour, for dusting
Strawberry Filling
- 2 cups fresh strawberries, hulled and diced (or frozen, thawed and drained)
- 3 tbsp granulated sugar
- 1 tbsp cornstarch
- 1 tsp lemon juice, freshly squeezed
- 1/2 tsp vanilla extract
Egg Wash
- 1 large egg, beaten with 1 tbsp water
Icing
- 1/2 cup powdered sugar, sifted
- 1-2 tbsp milk or heavy cream
- 1/4 tsp vanilla extract
Ingredient Notes
Puff pastry. This is the backbone of your strawberry danish, and using a good quality store bought puff pastry makes all the difference. Look for all butter puff pastry in the freezer section of your grocery store; brands like Dufour or Pepperidge Farm work wonderfully. The butter content is what creates those beautiful flaky layers as the pastry bakes. If you cannot find all butter, standard puff pastry still works well. Keep it chilled until you are ready to roll it out. You can find high quality all butter puff pastry online if your local store does not carry it.
Fresh strawberries. The star of the filling. You want ripe, fragrant strawberries that are deep red all the way through. The natural sweetness and acidity of the berries is what makes this filling so special. If your strawberries are underripe, they will be less flavorful and more tart. You can use frozen strawberries as a substitute, but make sure to thaw them completely and drain off the excess liquid before cooking. Otherwise your filling will be too watery and will not thicken properly.
Cornstarch. This is the thickening agent that transforms the strawberries from a watery mess into a luscious, jammy filling. Cornstarch works by absorbing the liquid released from the strawberries as they cook, creating a glossy, stable gel that holds its shape inside the pastry. Do not skip this ingredient. Arrowroot powder or tapioca starch can be used as a substitute in a pinch, but the texture will be slightly different.
Lemon juice. A small amount of fresh lemon juice does two important things. It brightens the flavor of the strawberries, making them taste more vibrant and less flat. It also helps the filling set properly by interacting with the cornstarch. Always use freshly squeezed lemon juice; the bottled stuff has a dull, metallic taste that will affect your filling.
Powdered sugar. The base for the simple icing that makes these danishes look like they came from a French patisserie. Sifting the powdered sugar is important because it removes lumps and ensures a smooth, silky icing. The icing is purely decorative and sweet, but it adds a beautiful visual contrast to the golden brown pastry and red filling.
How to Make Perfect Strawberry Danish
Phase 1: Prepare the Strawberry Filling
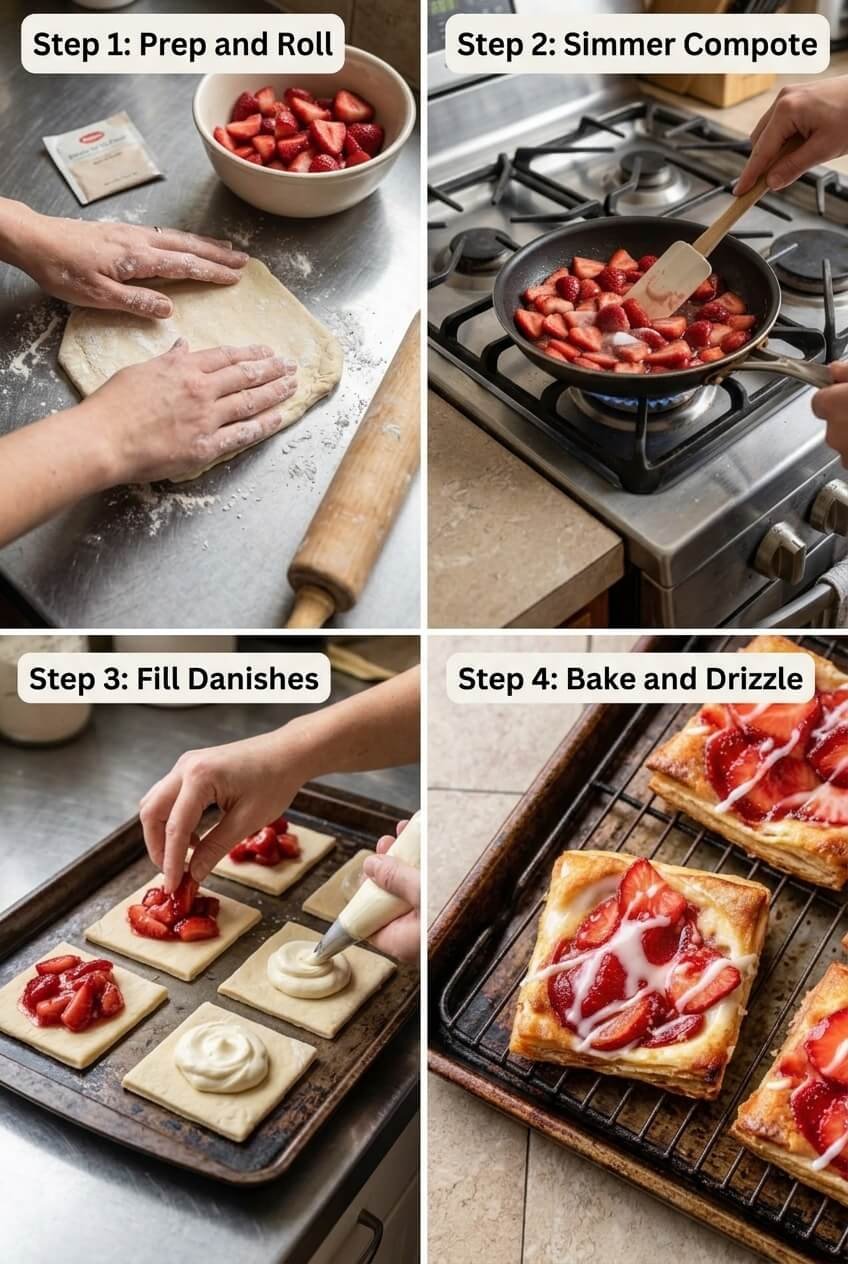
Cook the strawberries down into a thick, glossy filling. In a medium saucepan, combine the 2 cups of diced strawberries, 3 tablespoons of granulated sugar, 1 tablespoon of cornstarch, 1 teaspoon of lemon juice, and 1/2 teaspoon of vanilla extract. Stir everything together until the cornstarch is dissolved and the strawberries are evenly coated. Place the saucepan over medium heat and cook, stirring constantly with a rubber spatula or wooden spoon. You will notice the strawberries begin to release their juices and the mixture will look quite watery at first. Keep stirring. After about 3 minutes, the mixture will start to thicken and become glossy. Cook for a total of 5 to 7 minutes, or until the filling is thick enough that it does not immediately run back together when you drag your spatula across the bottom of the pan. The color will deepen to a beautiful ruby red and the aroma will fill your kitchen with the scent of cooked strawberries. Pro tip: For a smoother filling, mash the strawberries slightly with a fork while they cook, but leaving some chunks gives a nicer texture. Remove the pan from the heat and transfer the filling to a clean bowl. Let it cool completely before using. Warm filling will melt the butter in the puff pastry and create a soggy mess.
Phase 2: Preheat and Prep the Pastry
Set yourself up for success with a properly prepped work surface and cold pastry. Preheat your oven to 400 degrees Fahrenheit, or 200 degrees Celsius. Line a large baking sheet with parchment paper. Lightly dust a clean countertop or cutting board with 1 tablespoon of all-purpose flour. Unfold your thawed puff pastry sheet onto the floured surface. If the pastry feels soft or sticky at all, place it in the refrigerator for 10 minutes to firm up. Roll the pastry out gently with a rolling pin into a 12 by 12 inch square. You do not need to press hard, just encourage it to stretch evenly. Using a sharp knife or a pizza cutter, cut the pastry into 4 equal squares, each about 6 by 6 inches. Pro tip: Keep the pastry cold for the best flakiness. If at any point the dough becomes too soft to work with easily, pop it back in the fridge for a few minutes. Cold butter is what creates those distinct layers when it hits the hot oven.
Phase 3: Assemble the Danishes
Fill and fold each pastry into its classic danish shape. Spoon about 2 tablespoons of the completely cooled strawberry filling into the center of each puff pastry square. Spread it slightly into a neat mound, leaving about a 1 inch border around the edges. You want the filling concentrated in the center so it does not leak out during baking. Working with one square at a time, take two opposite corners of the pastry and fold them over the filling so they overlap slightly in the center. Press gently where they meet to seal them together. The other two corners will remain open, creating that beautiful folded danish shape. In a small bowl, whisk together 1 large egg and 1 tablespoon of water to make the egg wash. Using a pastry brush, gently brush the exposed pastry on all four danishes with the egg wash. Be careful not to brush the filling itself, as the egg will make it look less appetizing. Pro tip: Do not overfill the danishes. Using more than 2 tablespoons of filling will cause it to bubble out and leak onto the baking sheet during baking, creating a sticky mess and uneven pastries.
Phase 4: Bake the Danishes to Golden Perfection
Watch them puff and brown into golden, flaky masterpieces. Arrange the assembled danishes on the prepared baking sheet, spacing them at least 2 inches apart to allow for puffing and spreading. Place the baking sheet in the preheated oven on the center rack. Bake for 18 to 22 minutes, rotating the pan halfway through for even browning. You will see the pastry rise dramatically in the first 10 minutes as the butter melts and creates steam. The danishes are done when they are deeply golden brown all over, puffed up high, and the edges look crisp and flaky. The filling will be bubbling slightly at the exposed edges, which is a good sign. If the pastry is browning too quickly on top but is not yet fully baked, you can tent loosely with aluminum foil for the last 5 minutes. Remove from the oven and transfer the danishes to a wire rack using a spatula. Let them cool for 10 minutes before icing. Pro tip: The danishes are fragile when hot straight out of the oven. Let them rest on the baking sheet for 2 to 3 minutes before moving them to the rack so they have time to set slightly.
Phase 5: Ice and Serve Your Strawberry Danishes
The final touch that makes these danishes truly irresistible. While the danishes are cooling, make the icing. In a small bowl, combine 1/2 cup of sifted powdered sugar, 1 tablespoon of milk or heavy cream, and 1/4 teaspoon of vanilla extract. Whisk until the mixture is completely smooth and has a thick but pourable consistency. If the icing is too thick to drizzle easily, add another tablespoon of milk. If it is too thin, whisk in a little more powdered sugar. Drizzle the icing generously over the warm danishes using a spoon, letting it cascade down the sides in irregular streaks. You can also transfer the icing to a small zip top bag, snip off a tiny corner, and pipe it for more control. Serve the danishes warm for the best texture, or let the icing set for about 5 minutes if you prefer a cleaner presentation. Pro tip: For a thicker, creamier icing that sets up more firmly, use heavy cream instead of milk.
Pro Tips and Easy Variations for Your Strawberry Danish
Pro Tips
- Use cold puff pastry straight from the fridge for maximum flakiness. Warm puff pastry is sticky, difficult to work with, and will not puff as dramatically in the oven. If the pastry feels soft at any point during assembly, refrigerate it for 10 minutes before continuing.
- Let the strawberry filling cool completely before assembling to prevent soggy pastry. Warm filling will melt the butter in the puff pastry, creating a dense, greasy texture instead of a light, flaky one. Make the filling first and let it cool while you prep other ingredients.
- For a glossy finish, brush the baked danishes with a little apricot jam before icing. Warm 2 tablespoons of apricot jam in the microwave for 10 seconds, then brush it over the baked pastry. This adds a beautiful sheen and a hint of additional sweetness that complements the strawberries perfectly.
- Handle the pastry as little as possible. Overworking puff pastry develops the gluten and makes it tough instead of tender and flaky. Use gentle hands, a light touch with the rolling pin, and cut cleanly with a sharp knife.
- Always preheat your oven fully before baking. Putting pastries into a cold or underheated oven will cause them to spread instead of puff. The initial blast of high heat is what creates the steam that lifts the layers and gives you that airy, delicate texture.
Delicious Variations
- Raspberry or mixed berry danish. Substitute the strawberries with 2 cups of fresh raspberries or a mix of raspberries, blackberries, and blueberries. Adjust the sugar to taste since different berries have varying levels of sweetness. The method is exactly the same.
- Cream cheese strawberry danish. Add a thin layer of 2 ounces of softened cream cheese under the strawberry filling for a creamy, tangy twist. Beat the cream cheese with 1 tablespoon of sugar and 1/4 teaspoon of vanilla until smooth before spreading it on the pastry.
- Almond strawberry danish. Sprinkle 2 tablespoons of sliced almonds over the icing before it sets. The nuts add a wonderful crunch and a nutty flavor that pairs beautifully with the sweet strawberries. You can also add 1/4 teaspoon of almond extract to the filling.
- Lemon strawberry danish. Add 1 teaspoon of finely grated lemon zest to the strawberry filling along with the lemon juice. The extra citrus aroma brightens the entire pastry and gives it a more complex, sophisticated flavor profile.
- Baked to order individual danishes. Freeze the assembled unbaked danishes on the baking sheet until solid, then transfer to a freezer bag. Bake directly from frozen, adding 5 to 7 minutes to the baking time. This is perfect for when you want a single fresh danish without making a whole batch.
If you love the idea of making impressive pastries at home, you should also try these blueberry lemon ricotta pancakes for another fruity, indulgent breakfast treat.
Serving Suggestions for a Perfect Dessert
These strawberry danishes are best served warm, when the pastry is still flaky and the filling is soft and jammy. For an extra indulgent touch, add a dollop of lightly sweetened whipped cream or a scoop of vanilla ice cream on the side. The cool creaminess balances the warm pastry and bright strawberry filling beautifully. A dusting of additional powdered sugar over the top right before serving makes them look even more elegant. For drinks, these danishes pair wonderfully with a cup of strong black coffee, an espresso, or a pot of Earl Grey tea. The slight bitterness of coffee or bergamot in the tea cuts through the sweetness of the pastry and icing.
This strawberry danish recipe is perfect for brunch gatherings, bridal showers, or afternoon tea parties. It scales up easily; just double or triple the ingredients and bake in batches. You can also make them smaller by cutting the puff pastry into 3 inch squares instead of 6 inch squares for dainty finger food pastries. For a complete dessert spread, serve these alongside fresh fruit salad and a light citrus sorbet. They are substantial enough to stand alone but elegant enough to be part of a larger spread.
Nutrition Information
(Approximate per serving, 4 servings total) Calories: 350, Fat: 18g, Carbohydrates: 42g, Protein: 4g, Fiber: 2g, Sodium: 180mg. Nutritional values are estimates only.
Storage and Make-Ahead Instructions
- Refrigerator: Store leftover strawberry danishes in an airtight container in the refrigerator for up to 3 days. The pastry will soften over time, but they are still delicious. Bring them to room temperature before serving or reheat them.
- Freezer: Freeze the baked danishes without the icing for up to 2 months. Wrap each danish individually in plastic wrap, then place them in a freezer safe bag. The icing does not freeze well as it can become watery when thawed, so add it after reheating.
- Reheating: The best way to revive leftover danishes is to place them on a baking sheet in a 350 degree Fahrenheit oven for 5 to 7 minutes. This re crisps the pastry and warms the filling through. Avoid using the microwave as it makes the pastry tough and chewy.
- Make-Ahead: You can prepare the strawberry filling up to 3 days in advance and store it covered in the refrigerator. Assemble the danishes up to 24 hours ahead of time and keep them covered in the refrigerator. Bake them fresh just before serving for the best results.
For a savory option that pairs beautifully with these pastries on a brunch table, try this Moroccan chicken tagine for a completely different but equally impressive meal.
Your Strawberry Danish Questions Answered
Can I use frozen strawberries for the filling?
Yes, you can use frozen strawberries, but they need to be thawed and drained well before cooking. Frozen berries release a lot of liquid as they thaw, and that extra moisture will make your filling too runny if you do not remove it. Let them thaw in a colander for about 20 minutes, then gently press out the excess liquid with a paper towel.
Can I make these strawberry danishes ahead of time?
Yes, you can assemble the danishes completely and store them unbaked in the refrigerator for up to 24 hours. Keep them covered so the pastry does not dry out. Bake them fresh just before serving for the best texture. You can also freeze the unbaked danishes for up to 2 months and bake straight from frozen, adding a few extra minutes to the baking time.
How do I prevent the strawberry filling from leaking out during baking?
The most important thing is to make sure your filling is thick enough before assembling. Cook it until it is glossy and holds its shape when you drag a spoon through it. Also, make sure the filling is completely cooled before you add it to the pastry, and do not overfill each danish. Sealing the edges of the pastry firmly also helps keep the filling contained.
What can I use instead of puff pastry?
Phyllo dough is the closest alternative, though it will produce a much crispier, flakier, and less buttery texture. You will need to brush each sheet with melted butter and layer several sheets together. Crescent roll dough from a tube also works in a pinch but the flavor and texture are noticeably different and less refined.
Why did my puff pastry not puff up?
There are a few common reasons. Your oven might not have been hot enough; always preheat fully to 400 degrees. The pastry might have been too warm when it went into the oven, causing the butter to melt before the steam could form the layers. Or the edges might not have been sealed properly, allowing steam to escape instead of lifting the pastry.
Can I make these gluten free or dairy free?
For a gluten free version, use a gluten free puff pastry if you can find one, but note the texture will be different. For dairy free, use a dairy free puff pastry and substitute the butter with a plant based alternative. Replace the milk in the icing with a dairy free milk like oat or almond milk. The filling itself is naturally gluten free and dairy free.
How do I know when the danishes are fully baked?
The danishes should be puffed up high, deeply golden brown all over, and the bottom should be crispy and browned when you lift one with a spatula. The filling will be bubbling slightly around the edges. If the tops are browning too quickly but the bottoms are still pale, reduce the oven temperature to 375 degrees for the last 5 minutes.
Can I double this recipe?
Absolutely. This recipe scales up easily for a crowd. Simply double all the ingredients and bake the danishes in batches on separate baking sheets. Make sure your baking sheets are not overcrowded because the danishes need space to puff up and the hot air needs to circulate around them for even browning.
More Incredible European Recipes to Try
If you loved making this strawberry danish recipe, you will probably enjoy exploring more European inspired desserts that share the same love for flaky pastry, fresh fruit, and simple elegant presentation. French inspired tarts are a wonderful next step, with a buttery crust filled with pastry cream and topped with seasonal fruits. Italian crostata is another beautiful option, a rustic fruit tart that is easier than pie but looks stunning on any dessert table. The contrast between the crumbly pastry and the sweet fruit filling feels very similar to the experience of biting into a perfect strawberry danish.
You might also enjoy making Danish style pastries from scratch if you ever want to try working with yeast dough. The process is more involved but incredibly rewarding, and the result is a tender, bread like pastry that is completely different from puff pastry but equally delicious. For a quicker option, baked fruit hand pies using pie dough are always a hit and can be made with the same strawberry filling. Each of these recipes celebrates the beauty of simple ingredients treated with care, which is exactly the philosophy behind this strawberry danish.
The Story Behind This Strawberry Danish
The danish pastry, known as wienerbrød in Denmark, actually has Austrian and French origins. In the mid 1800s, Danish bakers went on strike and Austrian bakers were brought in to replace them, bringing with them the technique of laminated dough. Danish bakers quickly adopted and refined the method, adding more butter and developing what we now know as the classic danish. The strawberry filled version became popular because of the abundance of fresh berries during the summer months in Northern Europe, where the short growing season makes the first ripe strawberries a celebrated event.
This recipe honors that tradition of using simple, high quality ingredients and clever technique to create something far greater than the sum of its parts. I developed it during a particularly rainy spring when all I wanted was a taste of sunshine. The bright, sweet strawberry filling against the rich, buttery pastry felt like exactly the comfort I needed. Every time I make these danishes now, I am reminded that you can create moments of joy and beauty in your own kitchen, even on the grayest days. That is the real magic of cooking.
Pin This Strawberry Danish Recipe for Later
Love this recipe? Save it to your favorite Pinterest board so you can find it again easily. Share it with friends and family who would enjoy making it too.
I hope you love making these strawberry danishes as much as I do. They are genuinely one of my favorite things to bake when I want something that looks impressive but comes together without stress. Please leave a comment below and let me know how yours turned out. I would especially love to hear which variation you tried and how you served them. Happy baking.
Want More Recipes Like This?
I put together 400 of my favorite recipes in one download. Chicken dinners, creamy pastas, easy cakes, quick breakfasts, and simple everyday meals the whole family actually eats. If you cook at home regularly, you will use this all the time.

Strawberry Danish
Ingredients
Method
- In a medium saucepan, combine diced strawberries, sugar, cornstarch, lemon juice, and vanilla extract. Cook over medium heat, stirring constantly, until the mixture thickens and becomes glossy (about 5-7 minutes). Remove from heat and let cool completely.
- Preheat your oven to 400°F (200°C). Line a baking sheet with parchment paper. Lightly flour a clean surface and roll out the puff pastry sheet to a 12x12-inch square. Cut the pastry into 4 equal squares (about 6x6 inches each).
- Place about 2 tablespoons of cooled strawberry filling in the center of each pastry square. Fold two opposite corners of each square over the filling, overlapping slightly, and press gently to seal. Brush the exposed pastry with egg wash.
- Arrange the pastries on the prepared baking sheet, spacing them at least 2 inches apart. Bake for 18-22 minutes, or until the pastry is puffed and golden brown. Transfer to a wire rack to cool for 10 minutes.
- In a small bowl, whisk together powdered sugar, milk, and vanilla extract until smooth. Drizzle the icing over the warm danishes. Serve immediately or let the icing set for 5 minutes.
Disclosure: This post may contain affiliate links. If you purchase through our links we may earn a small commission at no extra cost to you.
If you made this Strawberry Danish, please leave a comment below and let me know how it turned out.