Easy Fresh Strawberry Crisp Recipe, Easy American Dessert in 45 Minutes
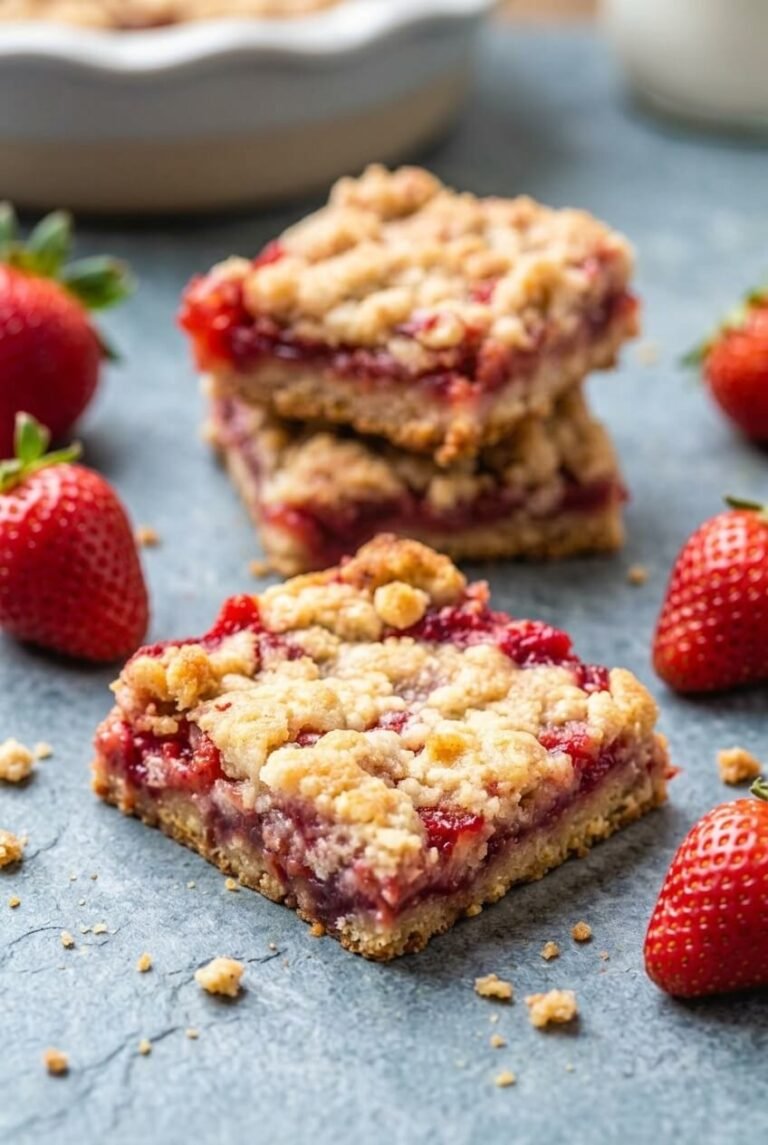
Easy Fresh Strawberry Crisp: Juicy, Sweet Strawberries Under a Golden Buttery Crumble
Table of Contents
- Easy Fresh Strawberry Crisp: Juicy, Sweet Strawberries Under a Golden Buttery Crumble
- Why You Will Love This Easy Fresh Strawberry Crisp Recipe
- Your Simple Ingredients for the Perfect Easy Fresh Strawberry Crisp
- How to Make Perfect Easy Fresh Strawberry Crisp
- Pro Tips and Easy Variations for Your Easy Fresh Strawberry Crisp
- Serving Suggestions
- Nutrition Information
- Storage and Make-Ahead Instructions
- Your Easy Fresh Strawberry Crisp Questions Answered
- More Incredible American Recipes to Try
- The Story Behind This Easy Fresh Strawberry Crisp
- Pin This Recipe for Later
Easy Fresh Strawberry Crisp: Juicy, Sweet Strawberries Under a Golden Buttery Crumble
I still remember the first time I tasted a truly perfect strawberry crisp. It was a warm June evening at my grandmother’s farmhouse, and she had just pulled a bubbling dish from the oven. The kitchen smelled like summer itself: sweet berries, brown sugar, and butter all mingling together in the most intoxicating way. She scooped it into bowls while it was still hot, topped each one with a generous scoop of vanilla ice cream, and handed me a spoon. That first bite was pure magic. The strawberries had softened into a jammy, syrupy filling while the crumble topping stayed perfectly crunchy and golden. It was simple, honest, and absolutely unforgettable.
This easy fresh strawberry crisp recipe is my tribute to that memory, but I have refined it over the years to be even more reliable and foolproof. The key is using ripe, in-season strawberries and a crumble topping made with cold butter for maximum crunch. I also add a touch of cornstarch to the filling so the juices thicken beautifully without becoming watery. Unlike a strawberry pie that requires precise crimping and rolling, this crisp comes together in minutes with no fuss. The topping is simply mixed by hand or with a pastry cutter, and the filling requires just a quick toss in a bowl. It is the kind of dessert that feels impressive but requires almost no effort.
This easy fresh strawberry crisp recipe is perfect for anyone who loves the taste of summer berries but wants a dessert that is straightforward and forgiving. It is ideal for weeknight dinners when you crave something sweet but do not want to spend hours in the kitchen. It also shines at summer barbecues, potlucks, and holiday gatherings because it feeds a crowd easily and pairs beautifully with ice cream or whipped cream. If you enjoy other fruit desserts, you will also love this blueberry lemon ricotta pancakes recipe for another way to showcase fresh berries. Whether you are a seasoned baker or a complete beginner, this recipe will make you look like a pro.
Why You Will Love This Easy Fresh Strawberry Crisp Recipe
- Incredibly quick and simple. From start to finish, this easy fresh strawberry crisp recipe takes about 45 minutes. You spend only 15 minutes actively prepping the filling and topping, then the oven does the rest of the work. It is faster than making a cake or pie crust.
- Uses just 8 basic ingredients. You likely have most of these on hand already. The strawberry filling needs only strawberries, sugar, cornstarch, lemon juice, and vanilla. The crumble topping uses flour, oats, brown sugar, salt, and butter. No fancy equipment or hard to find items are required.
- Perfectly balances sweet and tart flavors. The natural sweetness of ripe strawberries is enhanced by a little brown sugar, while fresh lemon juice brightens the filling and prevents it from being cloying. The buttery oat topping adds a savory richness that rounds everything out.
- Works for any occasion. This easy fresh strawberry crisp is casual enough for a Tuesday night dessert yet elegant enough for a dinner party. You can serve it in individual ramekins for a fancy presentation or in one big dish for family style sharing.
- Freezes beautifully. You can assemble this crisp ahead of time and freeze it unbaked for up to 3 months. When you need a last minute dessert, just pop it in the oven directly from the freezer, adding a few extra minutes to the baking time. It tastes just as fresh as the day you made it.
- Naturally egg free and easily adaptable. This recipe contains no eggs, which makes it great for those with egg allergies or dietary restrictions. It is also simple to make gluten free by swapping the flour and using certified gluten free oats.
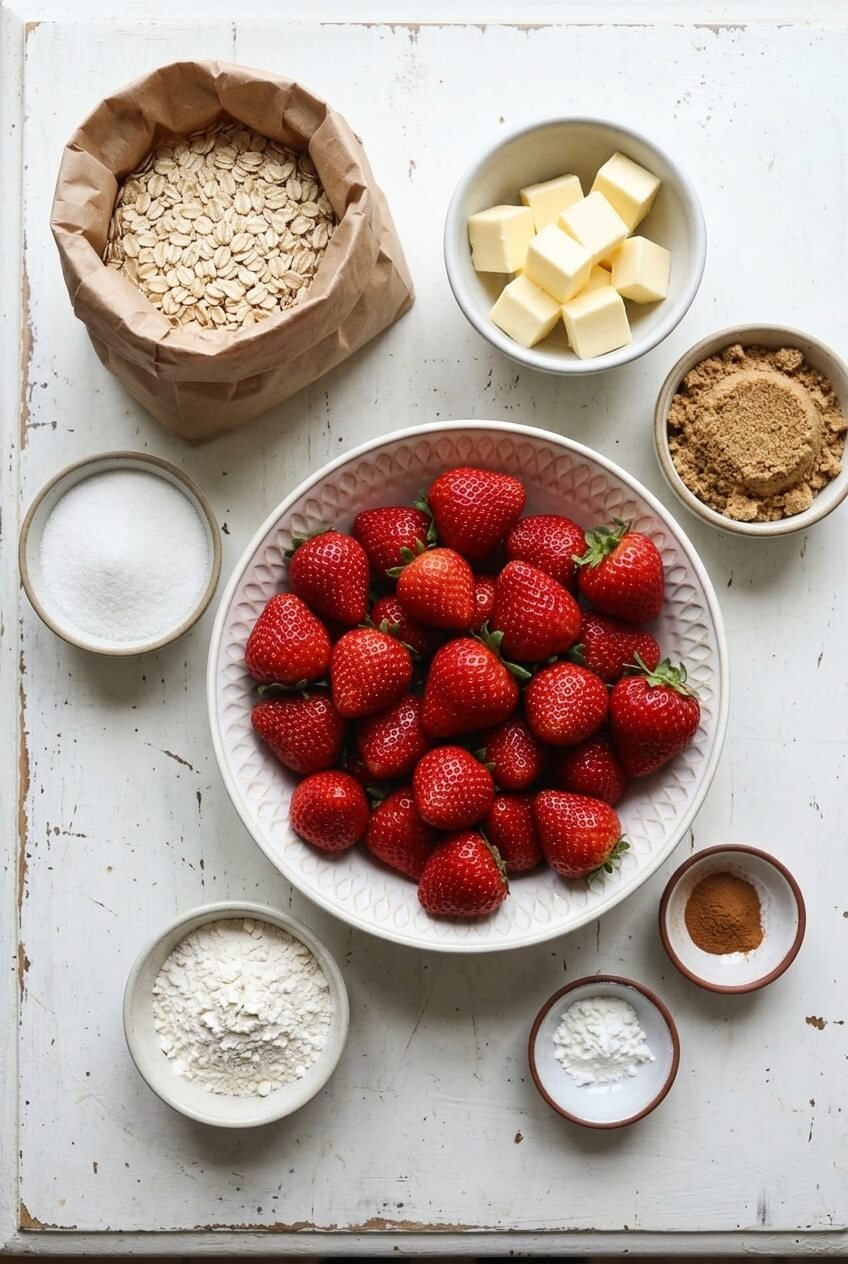
Your Simple Ingredients for the Perfect Easy Fresh Strawberry Crisp
Strawberry Filling
- 2 lbs fresh strawberries, hulled and halved (or quartered if large)
- 1/4 cup granulated sugar
- 2 tbsp cornstarch
- 1 tbsp fresh lemon juice
- 1 tsp vanilla extract
Crumble Topping
- 3/4 cup all-purpose flour
- 1/2 cup old-fashioned rolled oats
- 1/2 cup packed light brown sugar
- 1/4 tsp salt
- 1/2 cup cold unsalted butter, cut into small cubes
For Serving
- 4 scoops vanilla ice cream or whipped cream
Ingredient Notes
Fresh strawberries. The star of this easy fresh strawberry crisp recipe. For the best flavor and texture, use ripe, in-season strawberries that are deeply red and fragrant. Avoid berries that are pale or have white shoulders around the stem, as they will be less sweet and more tart. When strawberries are at their peak, they have a natural sweetness that means you can actually reduce the sugar slightly. If you cannot find fresh berries, you can use frozen strawberries, but be sure to thaw and drain them first so the filling does not become watery.
Granulated sugar. This adds sweetness to the filling and helps draw out the natural juices from the strawberries, creating that lovely syrupy consistency. You can adjust the amount based on how sweet your berries are. If they are very ripe and sweet, reduce the sugar by 1 or 2 tablespoons. For a more complex flavor, you can substitute half the granulated sugar with honey or maple syrup, though this will slightly change the texture.
Cornstarch. This is the thickening agent that transforms the strawberry juices into a glossy, jammy filling. Without it, your crisp would be runny and watery. Do not skip this ingredient. Make sure to toss the strawberries thoroughly so the cornstarch is evenly distributed. If you prefer a different thickener, you can use arrowroot powder or tapioca starch in the same amount. For a grain free option, try using 1 tablespoon of cornstarch from a trusted brand.
Fresh lemon juice. A small amount of lemon juice brightens the entire dish and balances the sweetness of the strawberries and brown sugar. It also helps prevent the berries from turning brown as they bake. Use freshly squeezed lemon juice for the best flavor. Bottled lemon juice works in a pinch but lacks the same bright, fresh taste. You can substitute lime juice for a slightly different citrus note.
Vanilla extract. Vanilla adds warmth and depth to the strawberry filling, rounding out the fruity sweetness. Use pure vanilla extract if possible, as it has a much richer flavor than imitation vanilla. You can also scrape the seeds from half a vanilla bean pod for an even more luxurious touch.
Old-fashioned rolled oats. These are essential for the crumble topping texture. Rolled oats give the crisp a wonderful chew and crunch that instant oats just cannot replicate. Do not use steel-cut oats, as they will remain too hard after baking. If you need this recipe to be gluten free, look for certified gluten free rolled oats.
Cold unsalted butter. Cold butter is the secret to a perfectly crispy crumble topping. When you cut cold butter into the dry ingredients, it creates small pockets of fat that melt during baking, leaving behind airy, flaky crumbles. If the butter gets too warm, the topping will become dense and greasy instead of light and crunchy. Keep your butter in the fridge until you are ready to use it, and work quickly.
How to Make Perfect Easy Fresh Strawberry Crisp
Phase 1: Preheat and Prepare Your Baking Dish
Start by preheating your oven to 375°F (190°C). While the oven heats up, lightly grease a 9×9-inch baking dish or a 1.5-quart baking dish with a little butter or nonstick spray. Using a glass or ceramic dish is ideal because these materials distribute heat evenly and help the crisp bake consistently. Metal pans can cause the edges to brown too quickly. Place the greased dish on a rimmed baking sheet to catch any drips during baking. This step is optional but highly recommended because the strawberry filling can bubble over and make a mess in your oven.
Phase 2: Make the Strawberry Filling
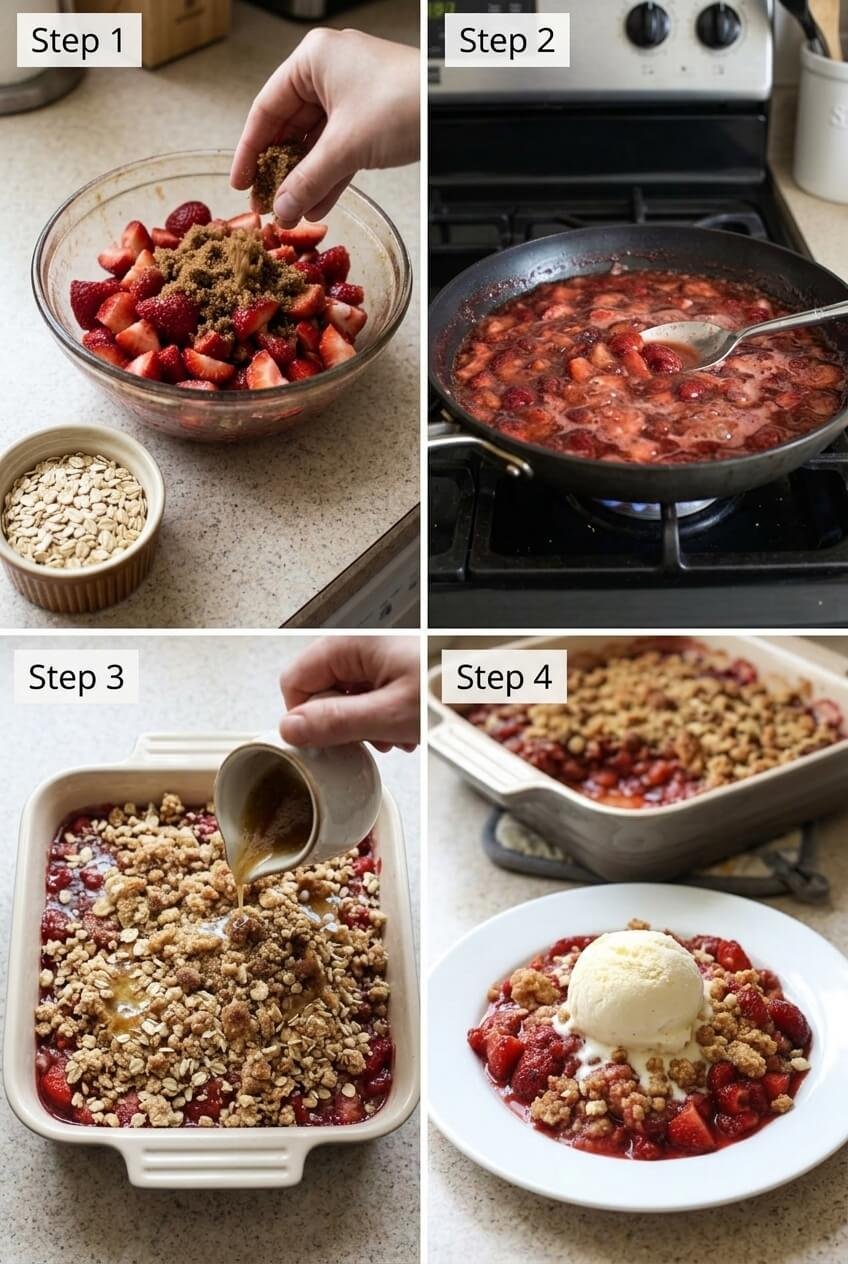
In a large bowl, gently toss the hulled and halved strawberries with the granulated sugar, cornstarch, fresh lemon juice, and vanilla extract. Use a rubber spatula or your hands to make sure every strawberry is evenly coated. Let the mixture sit for 5 minutes at room temperature. During this time, the sugar will draw out the natural juices from the berries, and the cornstarch will begin to dissolve. You will notice the strawberries start to look glossy and a small amount of pink liquid will pool at the bottom of the bowl. Do not skip this resting step, as it ensures the filling will thicken properly during baking. If your strawberries are very large, cut them into quarters rather than halves so all the pieces are similar in size for even cooking.
Phase 3: Prepare the Crumble Topping
In a separate medium bowl, whisk together the all-purpose flour, old-fashioned rolled oats, packed light brown sugar, and salt. Make sure there are no lumps of brown sugar. Add the cold butter cubes to the dry mixture. Using a pastry cutter, two forks, or your fingertips, work the butter into the flour mixture until it resembles coarse crumbs. You want to see some pea-sized pieces of butter remaining. These small butter chunks are what create the flaky, crispy texture in the finished topping. If the butter starts to feel warm or soft, pop the bowl into the refrigerator for 5 minutes to chill it again. Keep the butter cold for a crispier topping. Do not overwork the mixture, or the crumbs will become tough.
Phase 4: Assemble the Crisp
Pour the strawberry mixture into the prepared baking dish and spread it into an even layer with your spatula. Sprinkle the crumble topping evenly over the strawberries, covering them completely. Do not press the topping down. Leave it loose and fluffy so that it bakes into crunchy clusters. If you press it down, the topping will become dense and more like a crust than a crisp. Make sure the topping reaches all the way to the edges of the dish to seal in the strawberry juices below.
Phase 5: Bake the Crisp
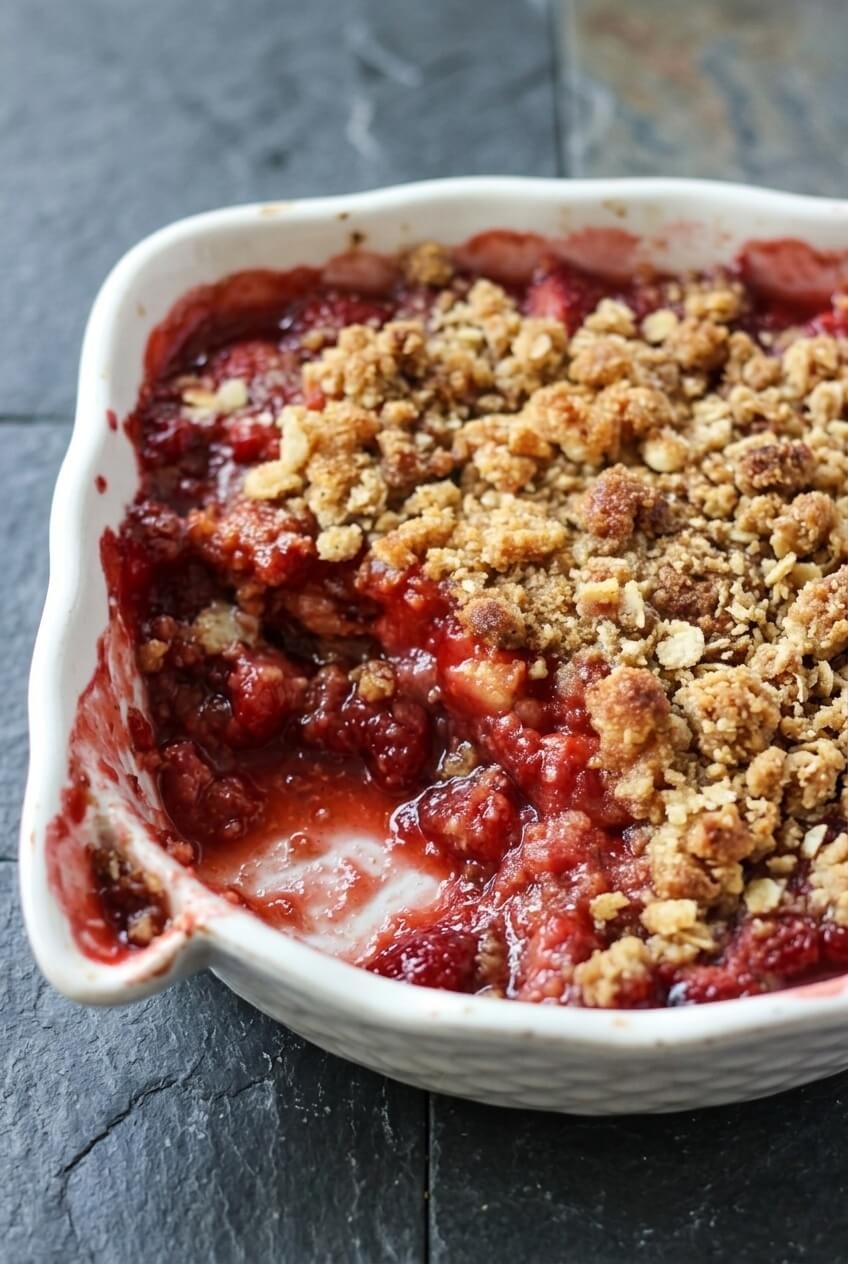
Place the baking dish on the center rack of your preheated oven. Bake for 30 to 35 minutes, or until the filling is bubbly and visibly thick and the topping is golden brown. You should see large bubbles breaking through the crumble around the edges of the dish. If the topping starts browning too quickly before the filling is bubbly, tent the dish loosely with aluminum foil and continue baking. The foil will protect the topping from burning while the filling finishes cooking. Let the crisp cool on a wire rack for 5 to 10 minutes after it comes out of the oven. This resting time allows the filling to set slightly so it does not run all over your plate when you serve it. You will also love this fluffy Japanese souffle pancakes for another warm, comforting dessert.
Phase 6: Serve the Crisp Warm
Spoon the warm crisp into serving bowls while it is still warm but not piping hot. Top each serving with a generous scoop of vanilla ice cream or a dollop of whipped cream. The contrast of the warm, jammy strawberry filling and the cold, creamy ice cream is truly the best part of this dessert. Serve immediately for the ultimate experience. If you have leftovers, you can reheat them later, but fresh out of the oven is absolutely the best way to enjoy this easy fresh strawberry crisp recipe.
Pro Tips and Easy Variations for Your Easy Fresh Strawberry Crisp
Pro Tips
- Use ripe, in-season strawberries for the best flavor. The sweetness and juiciness of your strawberries make or break this easy fresh strawberry crisp recipe. When strawberries are in season during late spring and summer, they are at their peak sweetness and require less added sugar. Look for berries that are bright red all the way through with no white or green shoulders. If you can smell their sweet aroma through the packaging, they are perfect.
- Do not skip the cornstarch. Cornstarch is what thickens the strawberry juices into that luscious, jammy filling. If you omit it, your crisp will be watery and the topping will get soggy. Make sure to toss the strawberries thoroughly so the cornstarch dissolves evenly. You can also use arrowroot powder or tapioca starch as a substitute, but the amount remains the same.
- Keep your butter cold for the crispiest topping. Cold butter is the single most important factor for a crunchy, flaky crumble. If your butter is too warm, the topping will spread out and become dense rather than forming those beautiful golden clusters. If at any point the butter feels soft, chill the bowl in the refrigerator for 10 minutes before proceeding.
- Let the crisp rest before serving. Patience here pays off. After baking, let the crisp sit for 5 to 10 minutes. This allows the filling to thicken and set slightly so it does not run all over your plate. The topping also becomes more stable and crunchy during this resting time.
- Tent with foil if the topping browns too quickly. Every oven is different, and sometimes the topping can get dark before the filling is fully cooked through. If you notice the crumble looking deeply golden after 20 minutes of baking, loosely cover the dish with aluminum foil and continue baking. The foil protects the topping while the filling finishes bubbling.
- If your strawberries are very sweet, reduce the sugar by 1 to 2 tablespoons. The amount of sugar needed depends entirely on the ripeness of your fruit. Taste a strawberry before you start. If it is already intensely sweet, use less sugar in the filling. You can always add a little more sweetness at the table with a drizzle of honey or extra ice cream.
Delicious Variations
- Mixed Berry Crisp. Replace half the strawberries with blueberries, raspberries, or blackberries for a colorful and flavorful twist. The different berries each bring their own sweetness and tartness, creating a more complex filling. Adjust the sugar based on the tartness of your berry mix.
- Gluten Free Strawberry Crisp. Use a high quality gluten free all-purpose flour blend and certified gluten free rolled oats. Make sure your blend contains xanthan gum for the best texture. The topping will still be crunchy and delicious, and your gluten sensitive friends will thank you.
- Warm Spiced Crisp. Add 1/2 teaspoon of ground cinnamon and a pinch of nutmeg to the crumble topping for a cozy, aromatic flavor. This variation is especially lovely during fall and winter when you crave warm spices alongside the bright berries. You can also add a tiny pinch of cardamom for something different.
- Almond Strawberry Crisp. Add 1/4 cup of sliced almonds to the crumble topping for extra crunch and a nutty flavor that pairs beautifully with strawberries. You can also substitute 2 tablespoons of the all-purpose flour with almond flour for a more pronounced almond taste.
- Individual Ramekin Crisps. Divide the strawberry mixture and crumble topping among 4 small ramekins or oven safe bowls. Bake for 20 to 25 minutes instead of 30 to 35, since the smaller portions cook faster. This makes a beautiful presentation for dinner parties and eliminates the need for scooping.
For another delicious American dessert, try this Moroccan chicken tagine recipe for a savory twist on comfort food.
Serving Suggestions for a Perfect Dessert
This easy fresh strawberry crisp recipe is delicious on its own, but a few simple accompaniments can elevate it to something truly special. The classic pairing is a generous scoop of vanilla ice cream, which melts into the warm filling and creates a creamy, cold contrast to the crunchy topping. If you prefer something lighter, a dollop of freshly whipped cream or a spoonful of Greek yogurt works beautifully. For a gourmet twist, drizzle a little balsamic glaze over the top before serving. The tangy sweetness of balsamic vinegar highlights the strawberries’ natural flavor in an unexpected way. You can also top each serving with a few fresh mint leaves for a pop of color and freshness. For drinks, a tall glass of iced tea or a crisp white wine like Sauvignon Blanc pairs wonderfully with the fruity dessert.
This dish is perfect for summer barbecues, Fourth of July celebrations, family reunions, or any casual gathering where you want a dessert that feels homemade and heartfelt. It is also wonderful for a quiet weeknight treat when you need a little sweet comfort. To scale this recipe for a crowd, simply double all the ingredients and use a 9×13-inch baking dish. Increase the baking time to 40 to 45 minutes. You can also serve it for brunch alongside a spread of pancakes and fresh fruit for a truly indulgent morning. If you want to make it a complete meal, pair it with a simple green salad and grilled chicken beforehand, then let the crisp shine as the sweet finale.
Nutrition Information
(Approximate per serving, 4 servings total) Calories: 380, Fat: 16g, Carbohydrates: 58g, Protein: 5g, Fiber: 4g, Sodium: 180mg. Nutritional values are estimates only and may vary based on the specific ingredients and brands you use.
Storage and Make-Ahead Instructions
- Refrigerator: Store any leftover crisp in an airtight container in the refrigerator for up to 4 days. The topping will lose some of its crunch over time as it absorbs moisture from the filling, but the flavor will still be delicious. To refresh the topping, you can reheat it in the oven or air fryer.
- Freezer: You can freeze the fully baked and cooled crisp for up to 3 months. Wrap the dish tightly in plastic wrap, then a layer of aluminum foil, or transfer portions to freezer safe containers. To thaw, place the crisp in the refrigerator overnight. Reheat before serving.
- Reheating: For the best texture, reheat individual portions in the microwave for about 2 minutes on high power. For larger amounts, reheat in a 350°F oven for 10 to 15 minutes, uncovered, until the filling is bubbly and the topping is warm and slightly crunchy again. You can also use an air fryer at 350°F for 3 to 5 minutes for a quick reheat.
- Make-Ahead: You can assemble the entire crisp (without baking) up to 24 hours in advance. Cover the dish tightly with plastic wrap and refrigerate. When you are ready to bake, add 5 to 10 minutes to the baking time since the filling and dish will be cold. You can also prepare the crumble topping separately and store it in the refrigerator for up to 3 days, then sprinkle it on the filling just before baking.
Your Easy Fresh Strawberry Crisp Questions Answered
Can I use frozen strawberries instead of fresh?
Yes, you can use frozen strawberries. Thaw them completely and drain off the excess liquid before tossing them with the sugar and cornstarch. Frozen berries are often sweeter than fresh, so you may want to reduce the sugar by 1 to 2 tablespoons. Also, frozen berries release more juice, so the filling may be slightly more liquid. If needed, add an extra teaspoon of cornstarch to compensate.
Why is my strawberry crisp runny?
A runny crisp usually means the cornstarch did not have enough time to thicken the filling fully. Make sure the filling is bubbling visibly in the center of the dish before you remove it from the oven. Bubbles indicate that the cornstarch has activated and thickened the juices. Also, be sure to let the crisp rest for 5 to 10 minutes after baking so the filling can set.
Can I make this easy fresh strawberry crisp recipe ahead of time?
Absolutely. You can assemble the crisp completely without baking, cover it, and refrigerate for up to 24 hours. When ready to bake, add 5 to 10 extra minutes to the baking time. You can also bake the crisp fully, let it cool, and then reheat it later. It tastes best within the first 2 days.
How do I know when the crisp is done baking?
The crisp is done when the filling is bubbling actively and the topping is a deep golden brown. Look for large, thick bubbles breaking through the crumble around the edges. If you tilt the dish gently, the filling should look thick and jammy rather than thin and watery. A thermometer inserted into the filling should read at least 200°F.
Can I substitute the oats with something else?
Yes, if you do not have rolled oats, you can use an equal amount of chopped nuts like pecans or walnuts, or simply increase the flour by 1/4 cup. The oats add a chewy texture and nutty flavor, but the crisp will still be delicious without them. Avoid using instant oats, as they become too soft and lose their texture during baking.
Can I make this recipe vegan?
Yes, this easy fresh strawberry crisp recipe can easily be made vegan. Substitute the butter with a high quality vegan butter stick (not margarine spread) that has a high fat content for the best texture. The rest of the ingredients are naturally vegan. Serve with coconut milk ice cream or a dollop of coconut whipped cream.
What is the best baking dish to use?
A 9×9-inch square glass or ceramic baking dish works perfectly for this recipe. These materials heat evenly and help the crisp bake consistently. If you use a metal pan, reduce the oven temperature by 25°F to prevent over-browning on the bottom and edges. You can also use a 1.5-quart round baking dish or even a cast iron skillet.
Can I double this recipe?
Yes, you can easily double this recipe. Use a 9×13-inch baking dish and double all the ingredients. The baking time will increase to 40 to 45 minutes. Keep an eye on the topping and tent with foil if it browns too quickly. This is perfect for feeding a crowd at a party or holiday gathering.
How do I prevent the topping from getting soggy?
To keep the topping crunchy, make sure you do not press it down onto the strawberries. Leave it loose and fluffy. Also, let the crisp rest after baking so the steam can escape rather than being trapped under the topping. If you are storing leftovers, keep the container slightly open to allow moisture to escape.
Can I use other fruits besides strawberries?
Absolutely. This recipe works beautifully with any summer fruit or a combination of fruits. Try peaches, nectarines, cherries, or a mix of berries. Adjust the sugar based on the sweetness of your fruit. For firmer fruits like apples or pears, you may need to increase the baking time and add a bit more cornstarch.
More Incredible American Recipes to Try
If you love this easy fresh strawberry crisp recipe, you will also enjoy exploring other classic American desserts that showcase fresh fruit and simple techniques. Peach cobbler with its soft biscuit topping and juicy peaches is a natural next step, especially during late summer when peaches are at their peak. Apple crisp is another favorite that works beautifully for fall with the addition of warm spices like cinnamon and nutmeg. Both of these desserts follow a similar structure to strawberry crisp, so you can use the same skills you have learned here.
For something a little different, try a blueberry buckle or a cherry crumble, both of which feature a tender cake-like base under a crunchy streusel topping. These desserts are equally forgiving and perfect for using up a bounty of fresh fruit from the farmers market or your garden. And if you want to keep the strawberry theme going, try making strawberry shortcake with homemade biscuits and fresh whipped cream. Each of these recipes celebrates the simple pleasure of ripe fruit paired with a buttery, crunchy topping. They are the kinds of desserts that do not need fancy techniques, just good ingredients and a little love.
The Story Behind This Easy Fresh Strawberry Crisp
The crisp, also known as a crumble in some parts of the world, is a beloved American dessert with deep roots in early American cooking. Unlike a pie, which requires a rolled crust and intricate crimping, the crisp was born out of practicality and resourcefulness. Early settlers and farm cooks needed a way to use up an abundance of fresh fruit without the fuss of pastry. They discovered that a simple mixture of flour, butter, and sugar sprinkled over fruit and baked resulted in a dessert that was just as satisfying as pie, if not more so. The name “crisp” comes directly from the texture of the baked topping, which becomes delightfully crunchy as it bakes.
Over the generations, the crisp has evolved and adapted to include whatever fruits were in season. Strawberry crisp became especially popular in the 20th century as strawberry farming expanded across the United States. Today, this dessert remains a symbol of American home cooking, a dish that is both humble and deeply comforting. This easy fresh strawberry crisp recipe honors that tradition by keeping things simple and letting the natural flavor of the strawberries shine. It is a dessert that connects us to our grandmothers’ kitchens and to the simple pleasures of summer. Every time I make it, I am reminded of that June evening at my grandmother’s farmhouse, and I hope it brings you the same warmth and joy.
Pin This Easy Fresh Strawberry Crisp Recipe for Later
Love this recipe? Save it to your favorite Pinterest board so you can find it again easily. Share it with friends and family who would enjoy making it too. This easy fresh strawberry crisp recipe is perfect for summer gatherings, holiday meals, or any time you want a simple, delicious dessert.
I hope you love this easy fresh strawberry crisp recipe as much as I do. Please leave a comment below and let me know how it turned out for you. I would love to hear which variation you tried and what you served it with. Happy baking, friends.
Want More Recipes Like This?
I put together 400 of my favorite recipes in one download. Chicken dinners, creamy pastas, easy cakes, quick breakfasts, and simple everyday meals the whole family actually eats. If you cook at home regularly, you will use this all the time.

Easy Fresh Strawberry Crisp
Ingredients
Method
- Preheat your oven to 375°F (190°C). Lightly grease a 9x9-inch baking dish or a 1.5-quart baking dish.
- In a large bowl, gently toss the strawberries with granulated sugar, cornstarch, lemon juice, and vanilla extract until evenly coated. Let sit for 5 minutes to release juices.
- In a separate medium bowl, whisk together flour, oats, brown sugar, and salt. Add the cold butter cubes and use a pastry cutter or your fingertips to work the butter into the dry mixture until it resembles coarse crumbs with some pea-sized butter pieces.
- Pour the strawberry mixture into the prepared baking dish and spread evenly. Sprinkle the crumble topping evenly over the strawberries.
- Place the dish on a baking sheet to catch any drips. Bake for 30–35 minutes, until the filling is bubbly and the topping is golden brown. Let cool for 5–10 minutes.
- Spoon the warm crisp into bowls and top each serving with a generous scoop of vanilla ice cream. Serve immediately.
Disclosure: This post may contain affiliate links. If you purchase through our links we may earn a small commission at no extra cost to you.
If you made this Easy Fresh Strawberry Crisp, please leave a comment below and let me know how it turned out.