Red White and Blue Ice Cubes for 4th of July Recipe, Easy American Dessert in 45 Minutes
Red White and Blue Ice Cubes for 4th of July: Three Festive Layers That Make Any Drink a Celebration
Table of Contents
- Red White and Blue Ice Cubes for 4th of July: Three Festive Layers That Make Any Drink a Celebration
- Why You Will Love This Red White and Blue Ice Cubes for 4th of July Recipe
- Your Simple Ingredients for the Perfect Red White and Blue Ice Cubes for 4th of July
- How to Make Perfect Red White and Blue Ice Cubes for 4th of July
- Pro Tips and Easy Variations for Your Red White and Blue Ice Cubes for 4th of July
- Serving Suggestions
- Nutrition Information
- Storage and Make-Ahead Instructions
- Your Red White and Blue Ice Cubes for 4th of July Questions Answered
- More Incredible American Recipes to Try
- The Story Behind This Recipe
- Pin This Recipe for Later
Red White and Blue Ice Cubes for 4th of July: Three Festive Layers That Make Any Drink a Celebration
I still remember the first time I made these red white and blue ice cubes for 4th of July. It was a sweltering afternoon the day before the big neighborhood barbecue, and I was scrambling for something that would make our lemonade stand out. I had tried store bought decorations and themed straws before, but nothing felt quite as special. Then a friend mentioned these layered ice cubes, and honestly, it was one of those kitchen moments where I could not believe I had not thought of it sooner. The kids gathered around the counter watching me pour the colored water into the trays, and when I pulled them out the next day, those perfect little red, white, and blue cubes floating in tall glasses of lemonade made everyone smile. It was simple, but it was exactly what a Fourth of July celebration needed.
What makes this red white and blue ice cubes for 4th of July recipe different from other festive treats is how effortlessly it transforms a basic drink into a showstopper. The technique of freezing each layer separately is straightforward, but it creates that beautiful striped effect that looks like it took hours of work. I use standard ingredients that you likely have in your pantry, like food coloring and fresh fruit, but the result is anything but ordinary. The key is patience with the freezing process, letting each layer set completely before adding the next. A fluffy Japanese souffle pancakes recipe might steal the show at breakfast, but these ice cubes are the unsung hero of any patriotic party.
This particular recipe is perfect for home cooks of any skill level. Whether you are hosting a large backyard gathering or just want to surprise your family with something fun on the holiday, these ice cubes add a touch of whimsy without stress. They work beautifully with lemonade, sparkling water, clear sodas, or even cocktails for the adults. I have made them for potlucks, block parties, and quiet family dinners, and every single time someone asks how I made them. If you want a dessert or drink accent that is genuinely easy, visually impressive, and completely kid friendly, this is the recipe you need this Independence Day.
Why You Will Love This Red White and Blue Ice Cubes for 4th of July Recipe
- Incredibly fast to prepare. From start to finish, the active prep work takes only about 15 minutes. While the freezing time adds up, you can easily make these over an afternoon while doing other things around the house. Each layer freezes in just 15 minutes, so you never wait long.
- Uses simple pantry ingredients. You only need water, food coloring, and a few fresh berries to create something that looks professionally made. No special equipment or hard to find items are required, which makes this recipe accessible to everyone.
- Perfect for making ahead. These ice cubes store beautifully in the freezer for up to a month. You can prepare them days or even weeks before your celebration, then simply drop them into drinks when guests arrive. This is a huge time saver on a busy holiday.
- Naturally low in calories and sugar. Each serving of ice cubes has just 15 calories and 3 grams of sugar. If you skip the optional sweetener in the white layer, the sugar content drops even lower. This makes them a guilt free addition to any drink.
- Visually stunning every time. The three distinct layers create a clear red, white, and blue effect that looks absolutely beautiful in clear glasses or punch bowls. Your guests will genuinely think you spent way more effort than you actually did.
- Endlessly customizable. You can swap the food coloring for natural alternatives, add edible glitter, or use different fruits for the layers. This recipe is a fantastic base for your own creative touches, so you can make it your own.
Your Simple Ingredients for the Perfect Red White and Blue Ice Cubes for 4th of July
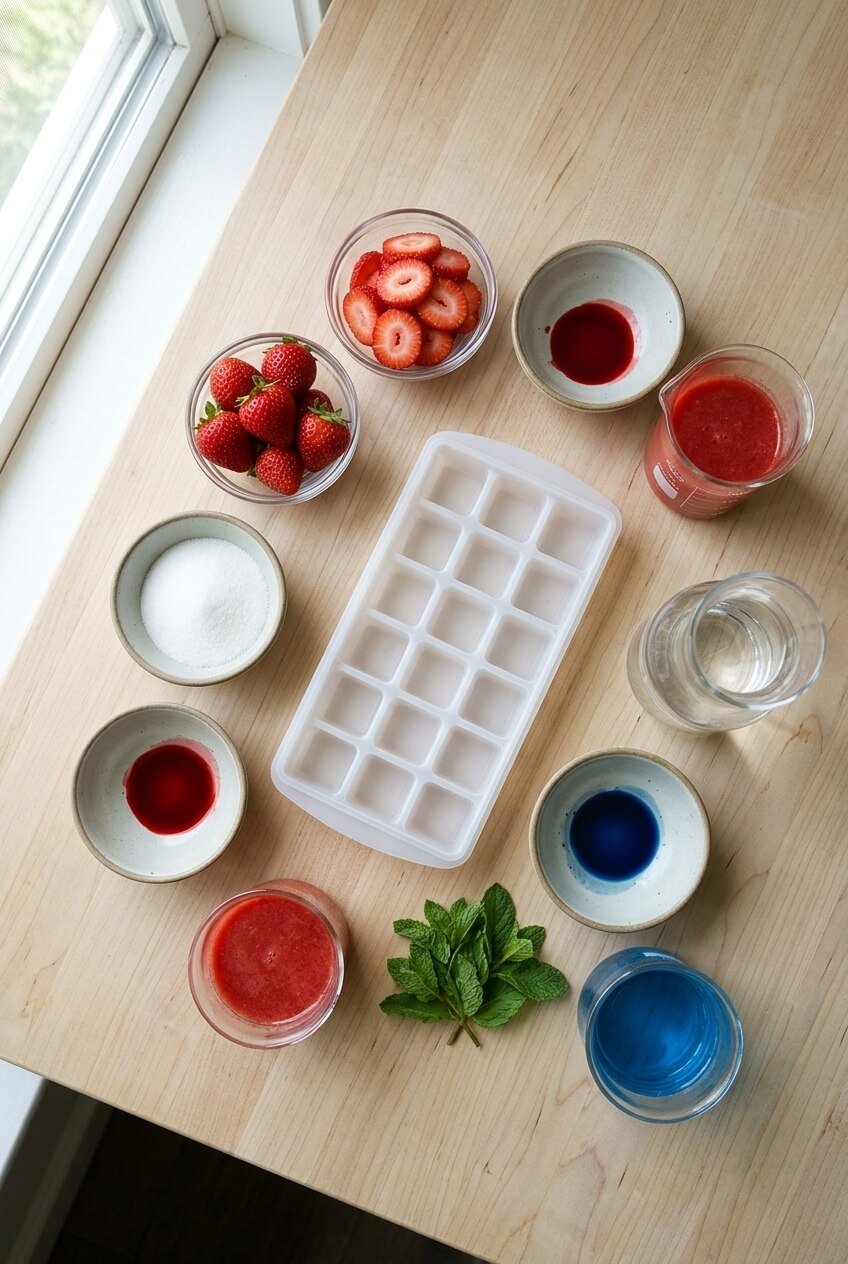
Red Layer
- 1/2 cup filtered water
- 4-5 drops red food coloring (gel or liquid)
- 2 strawberries, thinly sliced
White Layer
- 1/2 cup filtered water
- 1 tablespoon sugar (optional, for sweetness)
Blue Layer
- 1/2 cup filtered water
- 4-5 drops blue food coloring (gel or liquid)
- Blueberries (optional, for extra color)
Ingredient Notes
Water. The base of every layer is simply filtered water. Using filtered or distilled water makes a noticeable difference in clarity because it lacks the minerals and impurities that cause cloudiness in regular tap water. For the clearest ice cubes you can, boil the water first and let it cool completely before mixing with coloring. This step removes dissolved air bubbles that also contribute to a hazy appearance. If you only have tap water, your cubes will still work fine, they just may not be as crystal clear.
Food coloring. Both gel and liquid food coloring work well for this recipe, but gel food coloring is my preferred choice because it is more concentrated. You need fewer drops to achieve a deep, vibrant color, and it does not water down the layers as much as liquid versions can. If you are using liquid coloring, add one or two extra drops to get the same intensity. For a natural red hue, you can substitute beet juice, and for blue, blueberry juice works beautifully, though the colors will be softer.
Strawberries and blueberries. Fresh fruit adds a lovely visual element and a hint of natural sweetness to the ice cubes. For the strawberry slices in the red layer, aim for very thin slices, about one eighth inch thick, so they freeze evenly and fit neatly into the compartments. Blueberries for the blue layer are optional but highly recommended because they look like little jewels floating in the colored water. If you use frozen berries, let them thaw slightly and pat them dry first to prevent excess water from bleeding into the layers.
Sugar. The white layer includes an optional tablespoon of sugar dissolved in the water. This adds a subtle sweetness that balances the tartness of the berries and makes the cubes taste pleasant on their own. You can skip it entirely for a sugar free version, or substitute a drop of vanilla extract for a hint of flavor without sugar. Honey and agave syrup also dissolve nicely, though they may slightly tint the white layer.
How to Make Perfect Red White and Blue Ice Cubes for 4th of July
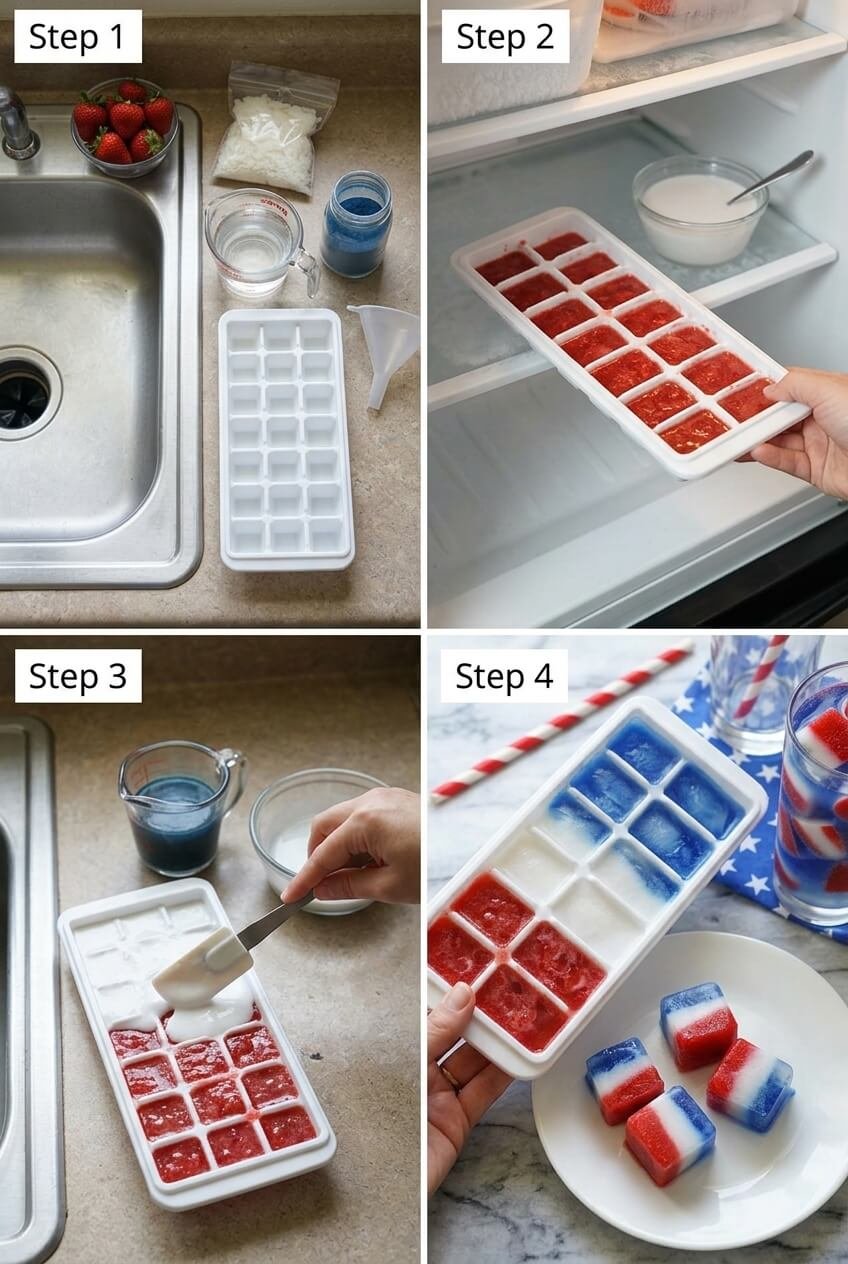
Prepare the Red Layer
Start by mixing the 1/2 cup of filtered water with 4 to 5 drops of red food coloring in a small bowl. Stir until the color is evenly distributed and you achieve a vibrant red shade that you love. Place a thin slice of strawberry into each compartment of your ice cube tray, pressing it gently against the bottom so it stays in place. Carefully pour the red water over the strawberries, filling each compartment about one third full. You want to stop at the one third mark so there is plenty of room for the next two layers. Place the tray in the freezer and freeze for 15 minutes, or until the red layer is completely solid to the touch. Using a silicone ice cube tray makes this step much easier because you can flex the tray to check if the layer has set without disturbing it.
Add the White Layer
While the red layer freezes, prepare the white layer by stirring 1/2 cup of filtered water with 1 tablespoon of sugar, if using, until the sugar dissolves completely. You want the water to be clear with no gritty residue. Once the red layer is fully frozen, remove the tray from the freezer. Pour the white water slowly over the frozen red layer, filling each compartment to the two thirds mark. Pour gently against the side of the compartment to avoid disturbing the red layer underneath. Return the tray to the freezer and freeze again for 15 minutes, until the white layer is solid. For a cloudier white that looks more like cream, substitute coconut milk or a splash of dairy milk for the plain water. This creates a beautiful contrast against the clear red and blue layers. Another recipe I love that uses similar layering is this Moroccan chicken tagine, though that one is savory and uses spices instead of colors.
Finish with the Blue Layer
Mix the remaining 1/2 cup of filtered water with 4 to 5 drops of blue food coloring in a small bowl. Stir until you have a vibrant blue hue. After the white layer is fully set, remove the tray from the freezer. Pour the blue water over the white layer, filling each compartment to the very top. If you want to add a blueberry to each cube, drop one gently into the blue water now. The blueberry will float slightly, which looks beautiful once frozen. Freeze for at least 30 minutes, or until the entire cube is completely solid. You can leave them in the freezer overnight if you prefer. Pouring the layers slowly is crucial to prevent bleeding between colors, especially when adding the blue layer over the white. If you pour too quickly, the colors may mix at the seam and create a muddy effect.
Unmold and Serve
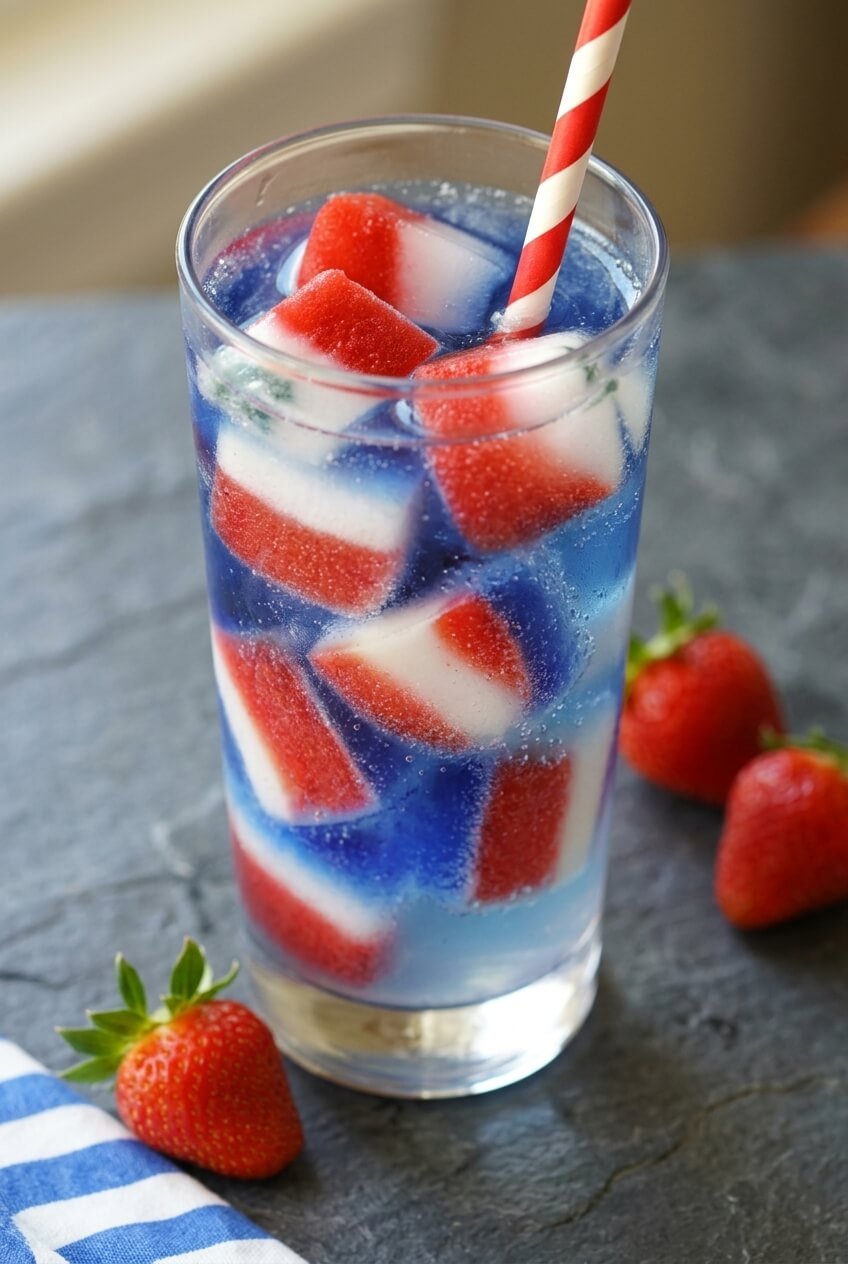
When you are ready to serve, remove the ice cubes from the tray by twisting it gently or running the bottom of the tray under warm water for a few seconds. The cubes should pop out easily, especially if you used a silicone tray. Drop two to three cubes into each tall clear glass so the layers are visible. Fill the glass with your favorite clear beverage, such as lemonade, sparkling water, clear soda, or even a simple glass of cold water. Garnish with a striped paper straw for the full patriotic effect. Serve immediately to enjoy the layered look before the colors start to blend as the cubes melt. For a fun twist, you can also add a sugar rim to the glass by dipping the rim in water and then in granulated sugar.
Pro Tips and Easy Variations for Your Red White and Blue Ice Cubes for 4th of July
Pro Tips
- Use distilled water for crystal clear cubes. Distilled water lacks the minerals and impurities that make ice cubes look cloudy. If you want those stunningly clear cubes you see in magazines, this is the single most important tip. Boiling the water first and letting it cool also removes air bubbles, which further enhances clarity.
- Freeze each layer completely before adding the next. This is non negotiable for clean layers. If the red layer is still slushy when you pour the white water, the colors will bleed together and you will lose the stripe effect. Fifteen minutes per layer is a good baseline, but check by touching the surface, it should feel solid and not sticky.
- Pour each new layer slowly against the side. Instead of dumping the water into the middle of the compartment, tilt the tray slightly and pour the water against the inner wall. This gentle addition helps prevent the new liquid from disturbing the frozen layer underneath, preserving those sharp color lines.
- Use gel food coloring for deeper, more vibrant colors. Gel coloring is more concentrated than liquid, so you need fewer drops and the color stays bold without watering down the cube. It is especially helpful for achieving a strong blue that does not look washed out once frozen.
- Silicone ice cube trays make removal effortless. Flexible silicone trays allow you to pop the cubes out by simply flexing the tray. If you use rigid plastic trays, you may need to run them under warm water to loosen the cubes, which can start melting the surface layers.
- Label your freezer bag with the date. These cubes look identical to regular ice cubes once frozen, so label the storage bag clearly. Otherwise someone might accidentally use them in a dark soda where the colors go unnoticed, or worse, toss them out thinking they are old plain ice.
Delicious Variations
- Natural fruit juice layers. Replace the food coloring with real fruit juices for a completely natural version. Use beet juice or pomegranate juice for the red layer, coconut milk for the white layer, and blueberry juice for the blue layer. The colors will be softer and more muted, but the flavor will be noticeably fruity and delicious.
- Edible glitter blue layer. Add a pinch of blue edible glitter to the blue water before freezing for a sparkly, magical effect. This is especially fun for kids or for a more glamorous party setting. The glitter catches the light beautifully when the cubes float in clear drinks.
- Tropical white layer. Replace the plain white water with coconut water for a tropical twist. The coconut water freezes clear but adds a subtle sweet flavor that pairs wonderfully with lemonade or pineapple juice. This variation is perfect for summer gatherings that feel more beachy than traditional.
- Herb infused layers. Steep a sprig of fresh mint or basil in the white water for 10 minutes before freezing to add a delicate herbal note. Strain out the leaves before pouring to keep the layer clear. Mint pairs especially well with lemonade and sparkling water.
- Sparkling water layers. Use club soda or sparkling water instead of still water for each layer. The carbonation creates tiny bubbles that get trapped in the ice, resulting in cubes that look effervescent and lively even before they hit your drink. Just be careful pouring to avoid excessive fizzing.
If you enjoy creative twists on classic recipes, you might also love these blueberry lemon ricotta pancakes for a breakfast that feels just as festive and special.
Serving Suggestions for a Perfect Dessert
These red white and blue ice cubes are incredibly versatile when it comes to serving. The most dramatic presentation is in clear glassware, where the layered colors are on full display. Tall Collins glasses, mason jars, or clear plastic cups all work beautifully. For beverages, stick with clear options like lemonade, sparkling water, club soda, white lemonade, or clear sodas such as Sprite or 7 Up. The cubes also look stunning floating in a large glass punch bowl filled with lemonade or fruit punch. Add a few extra berries and mint leaves to the punch bowl for a complete look. For the adults, clear cocktails like vodka sodas or gin and tonics become instant party drinks with these cubes. A simple sugar rim on each glass adds an extra touch of elegance and sweetness.
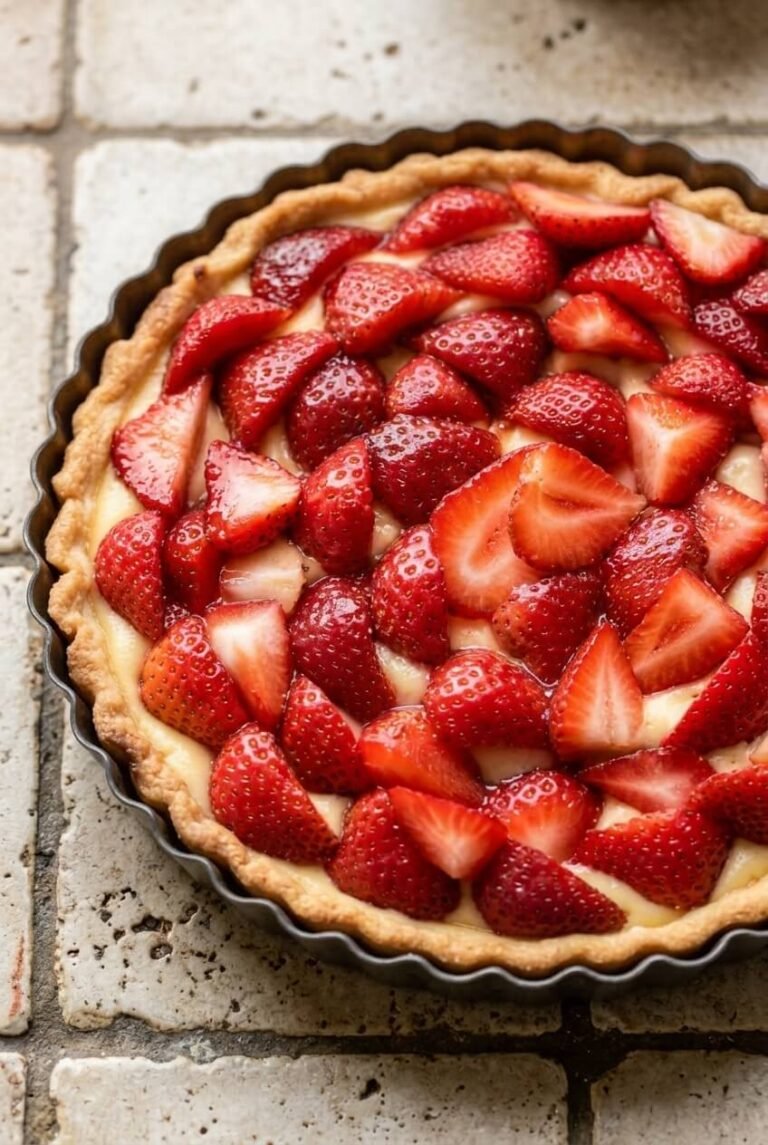
This recipe is perfect for Fourth of July barbecues, pool parties, picnics, and family reunions. Because the cubes take up very little space in the freezer, you can easily scale the recipe to serve a crowd by using multiple ice cube trays. Make a big batch over the course of an afternoon, and you will have enough for a party of 20 or more. Pair them with classic American cookout foods like burgers, hot dogs, coleslaw, and potato salad for a complete meal. For a dessert course, serve the ice cubes with homemade pies, fruit tarts, or a simple bowl of fresh berries and whipped cream. The cubes tie the whole meal together with a patriotic theme that feels intentional without being over the top.
Nutrition Information
(Approximate per serving, 4 servings total) Calories: 15, Fat: 0g, Carbohydrates: 4g, Protein: 0g, Fiber: 0g, Sodium: 5mg. Nutritional values are estimates only.
Storage and Make-Ahead Instructions
- Refrigerator: Not recommended. These ice cubes are meant to stay frozen until serving. Storing them in the refrigerator will cause them to melt and the layers to blend together, ruining the visual effect.
- Freezer: Store the finished ice cubes in an airtight container or a heavy duty zip top freezer bag for up to 1 month. Make sure to press out as much air as possible before sealing to prevent freezer burn. Label the bag with the date and contents so you do not mistake them for plain ice cubes later.
- Reheating: Not applicable. These are meant to be used frozen directly in drinks. Do not attempt to thaw or reheat them, as they will lose their structure and layered appearance.
- Make-Ahead: You can absolutely make these ice cubes days or weeks in advance. The entire process of layering and freezing can be done in one afternoon, then stored in the freezer until your celebration. This is actually the best way to do it, because you can focus on other party preparations on the day of your event.
Your Red White and Blue Ice Cubes for 4th of July Questions Answered
Can I use natural food coloring instead of artificial?
Absolutely. Beet juice works well for red, coconut milk for white, and blueberry juice for blue. Just be aware that natural colors tend to be less vibrant and more muted than artificial food coloring. You may need to use more juice to achieve the desired color.
How do I prevent the layers from mixing together?
The key is to freeze each layer completely solid, which takes about 15 minutes per layer. Also pour each new layer slowly against the side of the compartment rather than directly into the center. This gentle addition minimizes disturbance of the frozen layer underneath.
Can I make these ice cubes without food coloring?
Yes, you can use natural fruit juices as mentioned above. Another option is to use herbal teas that naturally have red or blue hues, such as hibiscus tea for red and butterfly pea flower tea for blue. These will add subtle flavors along with the color.
What size ice cube tray should I use?
Standard silicone ice cube trays with rectangular or square compartments work perfectly. You want compartments that are deep enough to hold three distinct layers, typically about one inch deep. Avoid mini cube trays because the layers will be too thin to see clearly.
How long do the layers take to freeze?
Each layer takes about 15 minutes in a standard home freezer. The final layer with the blue water may take up to 30 minutes because the entire cube needs to freeze through. Freezer temperatures vary, so check by touching the surface to ensure it is solid before adding the next layer.
Can I use frozen berries instead of fresh?
Yes, but let the frozen berries thaw slightly and pat them dry with a paper towel first. Frozen berries release extra liquid as they thaw, which can drip into the colored water and cause bleeding or dilution of the color.
Will the fruit affect the taste of my drink?
Slightly, but in a pleasant way. The strawberries and blueberries will infuse your drink with a very subtle fruit flavor as the cubes melt. This is generally a welcome addition, especially in lemonade or sparkling water. If you want no flavor transfer, use only colored water without fruit.
Can I double or triple this recipe easily?
Absolutely. Simply multiply the ingredients by the number of trays you have. The layering process is the same, just repeated across more compartments. You can freeze multiple trays simultaneously as long as they fit in your freezer without overlapping.
Why did my layers bleed together?
This usually happens because a layer was not fully frozen before the next one was added, or because you poured the new layer too quickly and forcefully. Make sure each layer is completely solid, and pour gently against the side of the compartment to avoid disturbing the frozen layer.
How do I get the cubes out of a rigid plastic tray?
Run the bottom of the plastic tray under warm tap water for about 10 to 15 seconds. This loosens the ice just enough to release the cubes. You can also twist the tray gently. For easiest removal, use silicone trays which flex and release the cubes without any water needed.
More Incredible American Recipes to Try
If you enjoyed making these red white and blue ice cubes for your Fourth of July celebration, you will likely appreciate other patriotic and festive American recipes that are equally simple to prepare. Classic American desserts like berry cobblers, fruit pies, and layered trifles all carry that same nostalgic, homey feeling that makes holidays special. For something a little different but still celebratory, consider making a batch of fluffy buttermilk pancakes topped with fresh berries and whipped cream. They look beautiful on a Fourth of July breakfast table and use many of the same ingredients you already have on hand.
Another fantastic option is a cool and creamy no bake cheesecake parfait layered with strawberries, blueberries, and a vanilla cream filling. These parfaits are just as easy as the ice cubes and can be made entirely ahead of time in individual glasses. For a savory counterpart, you might try a loaded potato salad or a sweet and tangy coleslaw that uses apple cider vinegar and a touch of honey. All of these recipes come together quickly and rely on simple, fresh ingredients that let the natural flavors shine. If you love making food that brings people together around a table with smiles and happy chatter, these recipes are exactly what your recipe collection needs.
The Story Behind This Red White and Blue Ice Cubes for 4th of July
The tradition of making layered ice cubes for holidays likely started with creative home cooks looking for ways to dress up simple beverages without complicated techniques. The red, white, and blue color scheme is, of course, a direct nod to the American flag, and these cubes have become a beloved staple at Independence Day gatherings across the country. While the exact origin is hard to pin down, the concept of coloring ice for decorative purposes dates back decades, with home entertaining magazines from the 1950s and 1960s featuring similar ideas for Christmas and Easter celebrations. The Fourth of July version is simply a natural evolution of that creative spirit.
What I love most about this recipe is how it embodies the best of American home cooking, resourceful, fun, and designed to bring people together. It does not require expensive ingredients or professional skills. It just asks for a little patience and a desire to make something beautiful for the people you care about. Every time I drop these cubes into a glass and watch the colors catch the sunlight, I think about all the backyard barbecues and neighborhood potlucks that make summer feel so special. This small touch of homemade love turns an ordinary drink into a memory, and that is really what holiday cooking is all about.
Pin This Red White and Blue Ice Cubes for 4th of July Recipe for Later
Love this recipe? Save it to your favorite Pinterest board so you can find it again easily. Share it with friends and family who would enjoy making it too. These cubes are the perfect way to add a festive touch to any summer gathering, and having the recipe saved means you can pull it out year after year.
I hope you love making these red white and blue ice cubes as much as I do. They are genuinely one of the simplest things you can create, but they bring so much joy to a celebration. Leave a comment below and let me know which variation you tried, or if you came up with your own twist on the layers. I would love to hear how your Fourth of July turned out.
Want More Recipes Like This?
I put together 400 of my favorite recipes in one download. Chicken dinners, creamy pastas, easy cakes, quick breakfasts, and simple everyday meals the whole family actually eats. If you cook at home regularly, you will use this all the time.

Red White and Blue Ice Cubes for 4th of July
Ingredients
Method
- In a small bowl, mix 1/2 cup water with red food coloring until you achieve a vibrant red. Place a slice of strawberry in each compartment of an ice cube tray. Pour the red water over the strawberries, filling each compartment about one-third full. Freeze for 15 minutes until solid.
- In another bowl, stir 1/2 cup water with sugar (if using) until dissolved. Once the red layer is frozen, remove the tray and pour the white water over the red layer, filling each compartment another third. Freeze again for 15 minutes.
- Mix the remaining 1/2 cup water with blue food coloring. After the white layer is set, pour the blue water over it, filling each compartment to the top. Add a blueberry to each cube if desired. Freeze for at least 30 minutes or until completely solid.
- Remove the ice cubes from the tray by twisting gently or running the bottom under warm water for a few seconds. Drop 2-3 cubes into each tall clear glass, add your favorite clear beverage (lemonade, soda, or water), and garnish with a striped straw.
Disclosure: This post may contain affiliate links. If you purchase through our links we may earn a small commission at no extra cost to you.
If you made this Red White and Blue Ice Cubes for 4th of July, please leave a comment below and let me know how it turned out.